Share this
by 3devo on Jul 26, 2021 5:38:00 PM

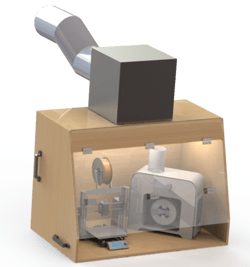
One of the most effective ways to secure your workplace is to buy a fume hood and get it installed strategically, especially if you’re working with filament extruders and 3D printers. Simply put, a fume hood is a ventilation device that limits exposure to toxic fumes or vapors. It facilitates seamless passage of all virulent air which, if accumulated, can be detrimental, causing severe health injuries to people working in that environment. These dedicated ventilating devices are often a mandatory requirement for certain workplace setups because of local industrial compliance measures. Above all, it is about creating a safe working environment, and when it comes to personal safety, we recommend zero compromises.
If you’re reading this, chances are you’re already looking to get a ventilating device installed at your workplace. There are all kinds available in the market, from top fancy expensive ductless fume hoods to low-cost, effective ones. While you can always get professional help or purchase a fume hood, with little effort, you can also create it yourself – all at the comfort of your home and saving yourself some cash. It is not as complicated as you might think.
Building vs. Buying a Fume Hood
Can’t we build one instead of purchasing a fume hood online? It is a common question that we are asked so many times. So, let’s break it down. If you’re sitting on the fence thinking about where to buy the best fume hood or how to build a ventilation system, here’re two essential factors you must consider.
- Budget: One of the most common concerns is the budget. Purchasing a fume hood can be slightly expensive. If you decide to buy a high-end ventilation system, a custom ductless fume hood in the market can be costly. On the other hand, you can build one on a budget that might be just right for your particular requirements.
- Effectiveness: Effectiveness is another key factor to consider while discussing options. While homemade budget devices have limited features, they can be equally effective if done correctly.
In this article, we walk you through a step-by-step process to build your fume hood! All you need to do is to follow along; it’s simple and easy.
Now, without further ado, let’s get started!
Introduction
By following these 15 steps of the average difficulty level in just four hours, you can have a custom DIY fume hood that will perfectly ventilate your workspace.
Difficulty – Average
Steps – 15
Time – 4 Hours
Costs – €400 – €550
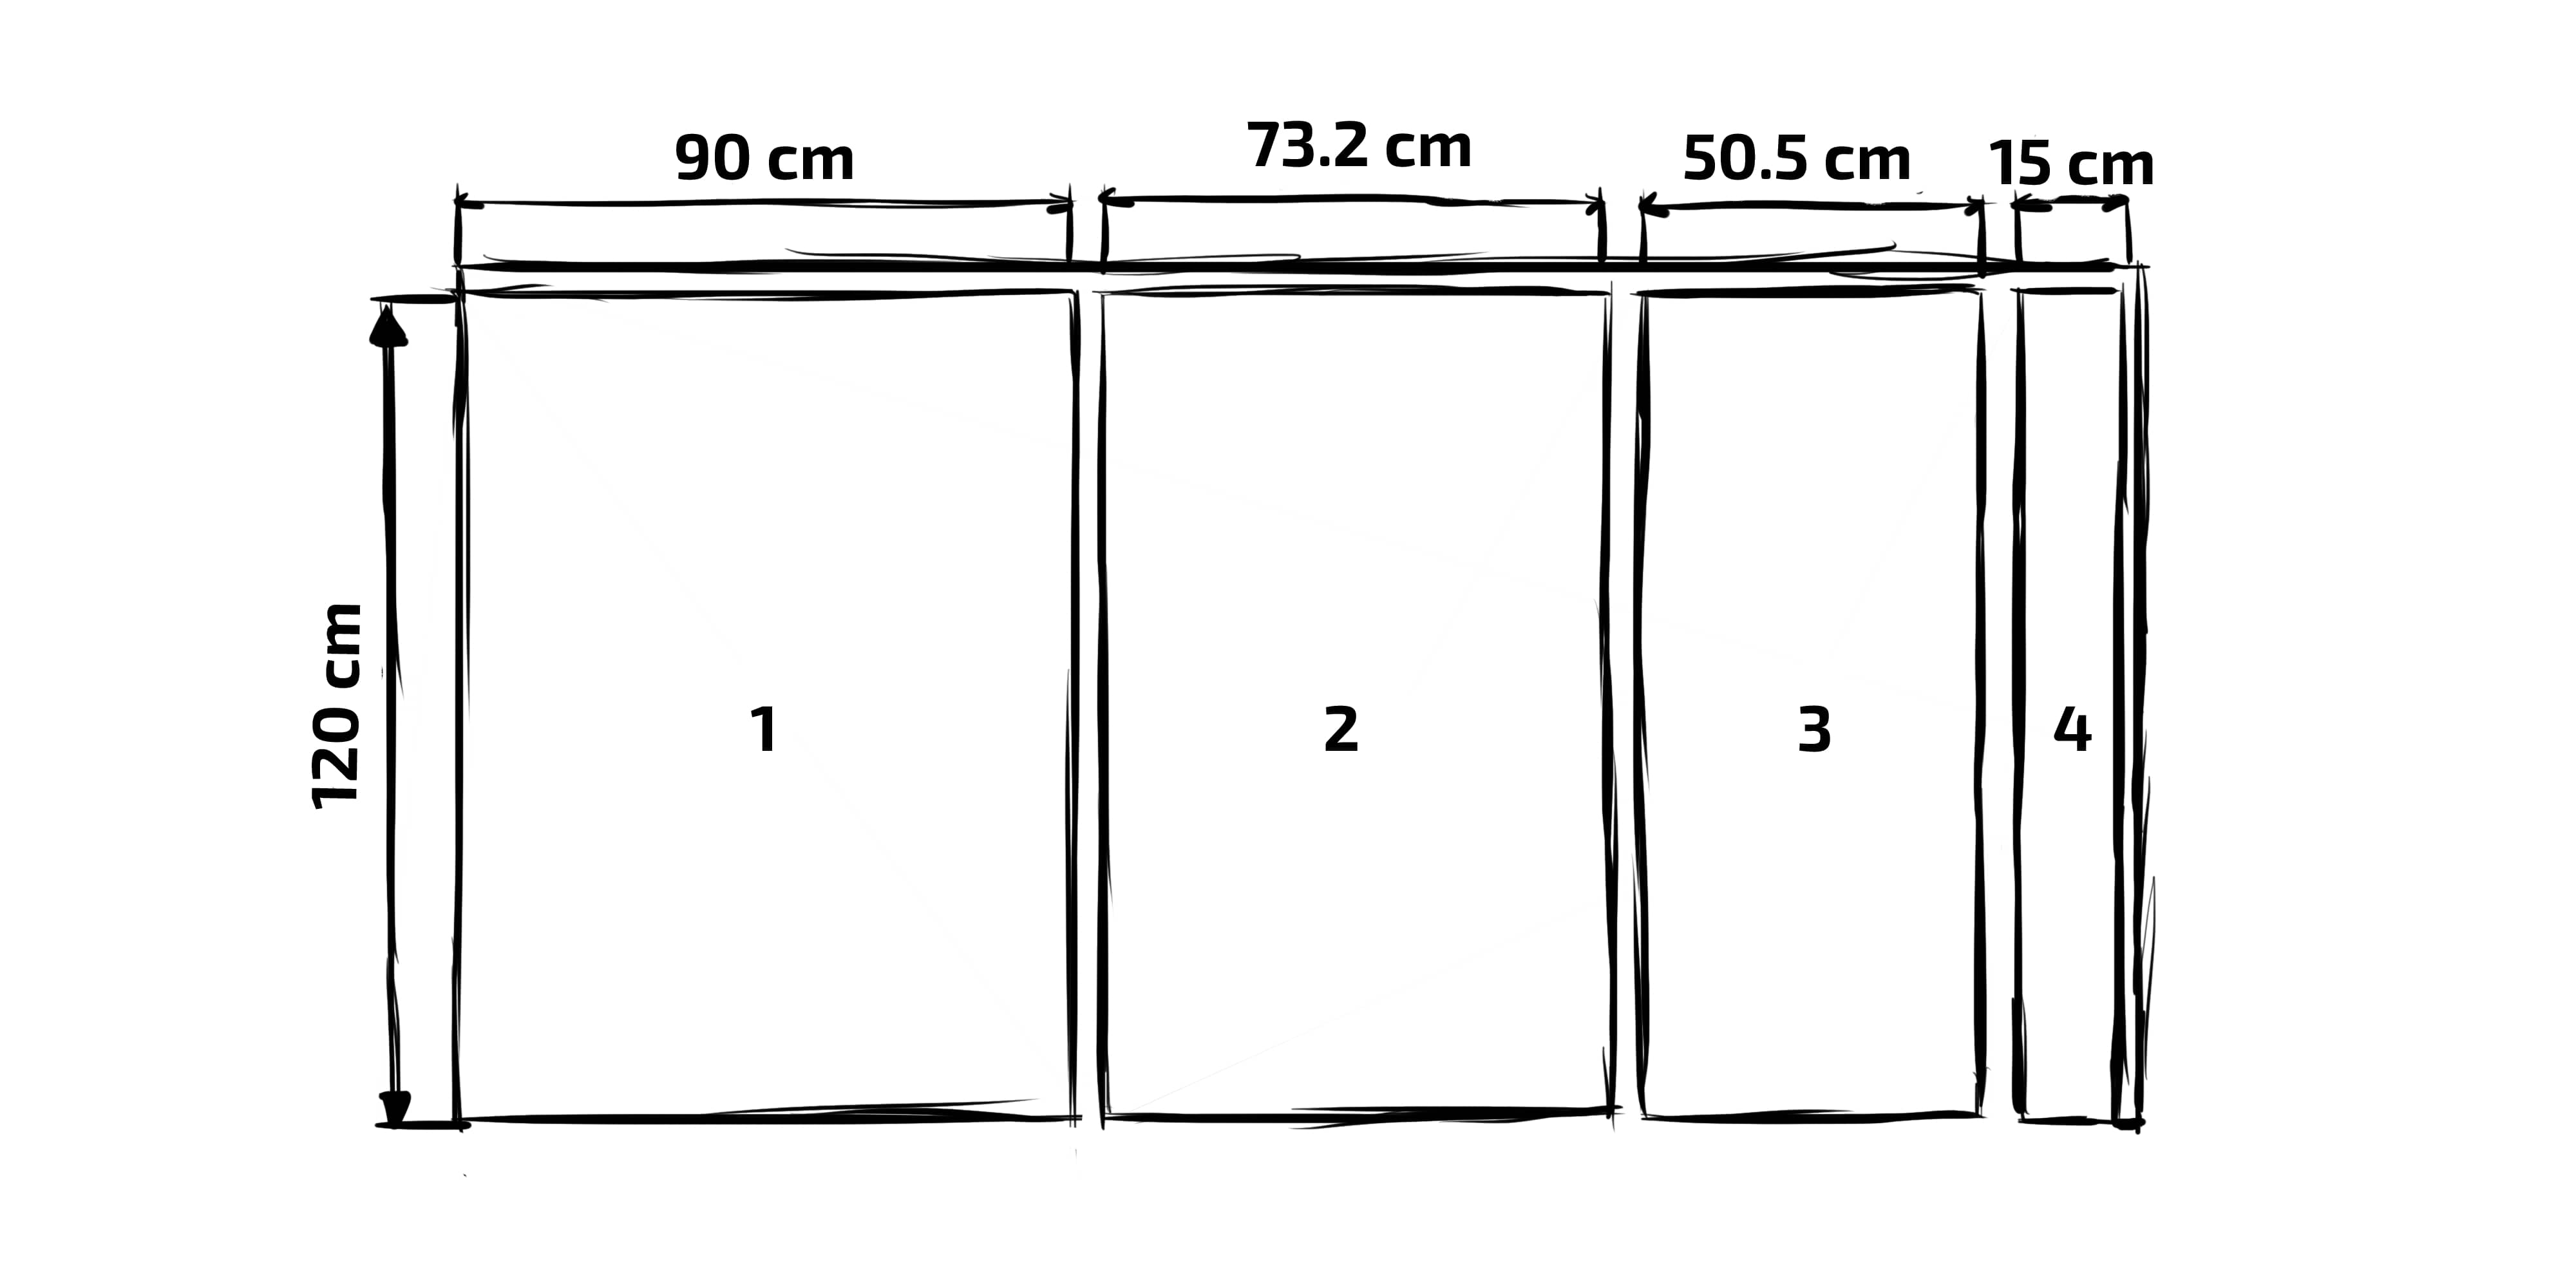
Dimensions – 124 x 75 x 90cm
Before you start following our guide, here’s a list of materials along with their estimated costs that you would need to make the best fume hood you can at home. We have also shared a list of tools to keep handy.
Note: The prices mentioned may vary depending on where you buy the tools and materials. Also, other contributing factors, such as local taxes, branding, packaging, material quality, etc., can contribute to a change in the prices.

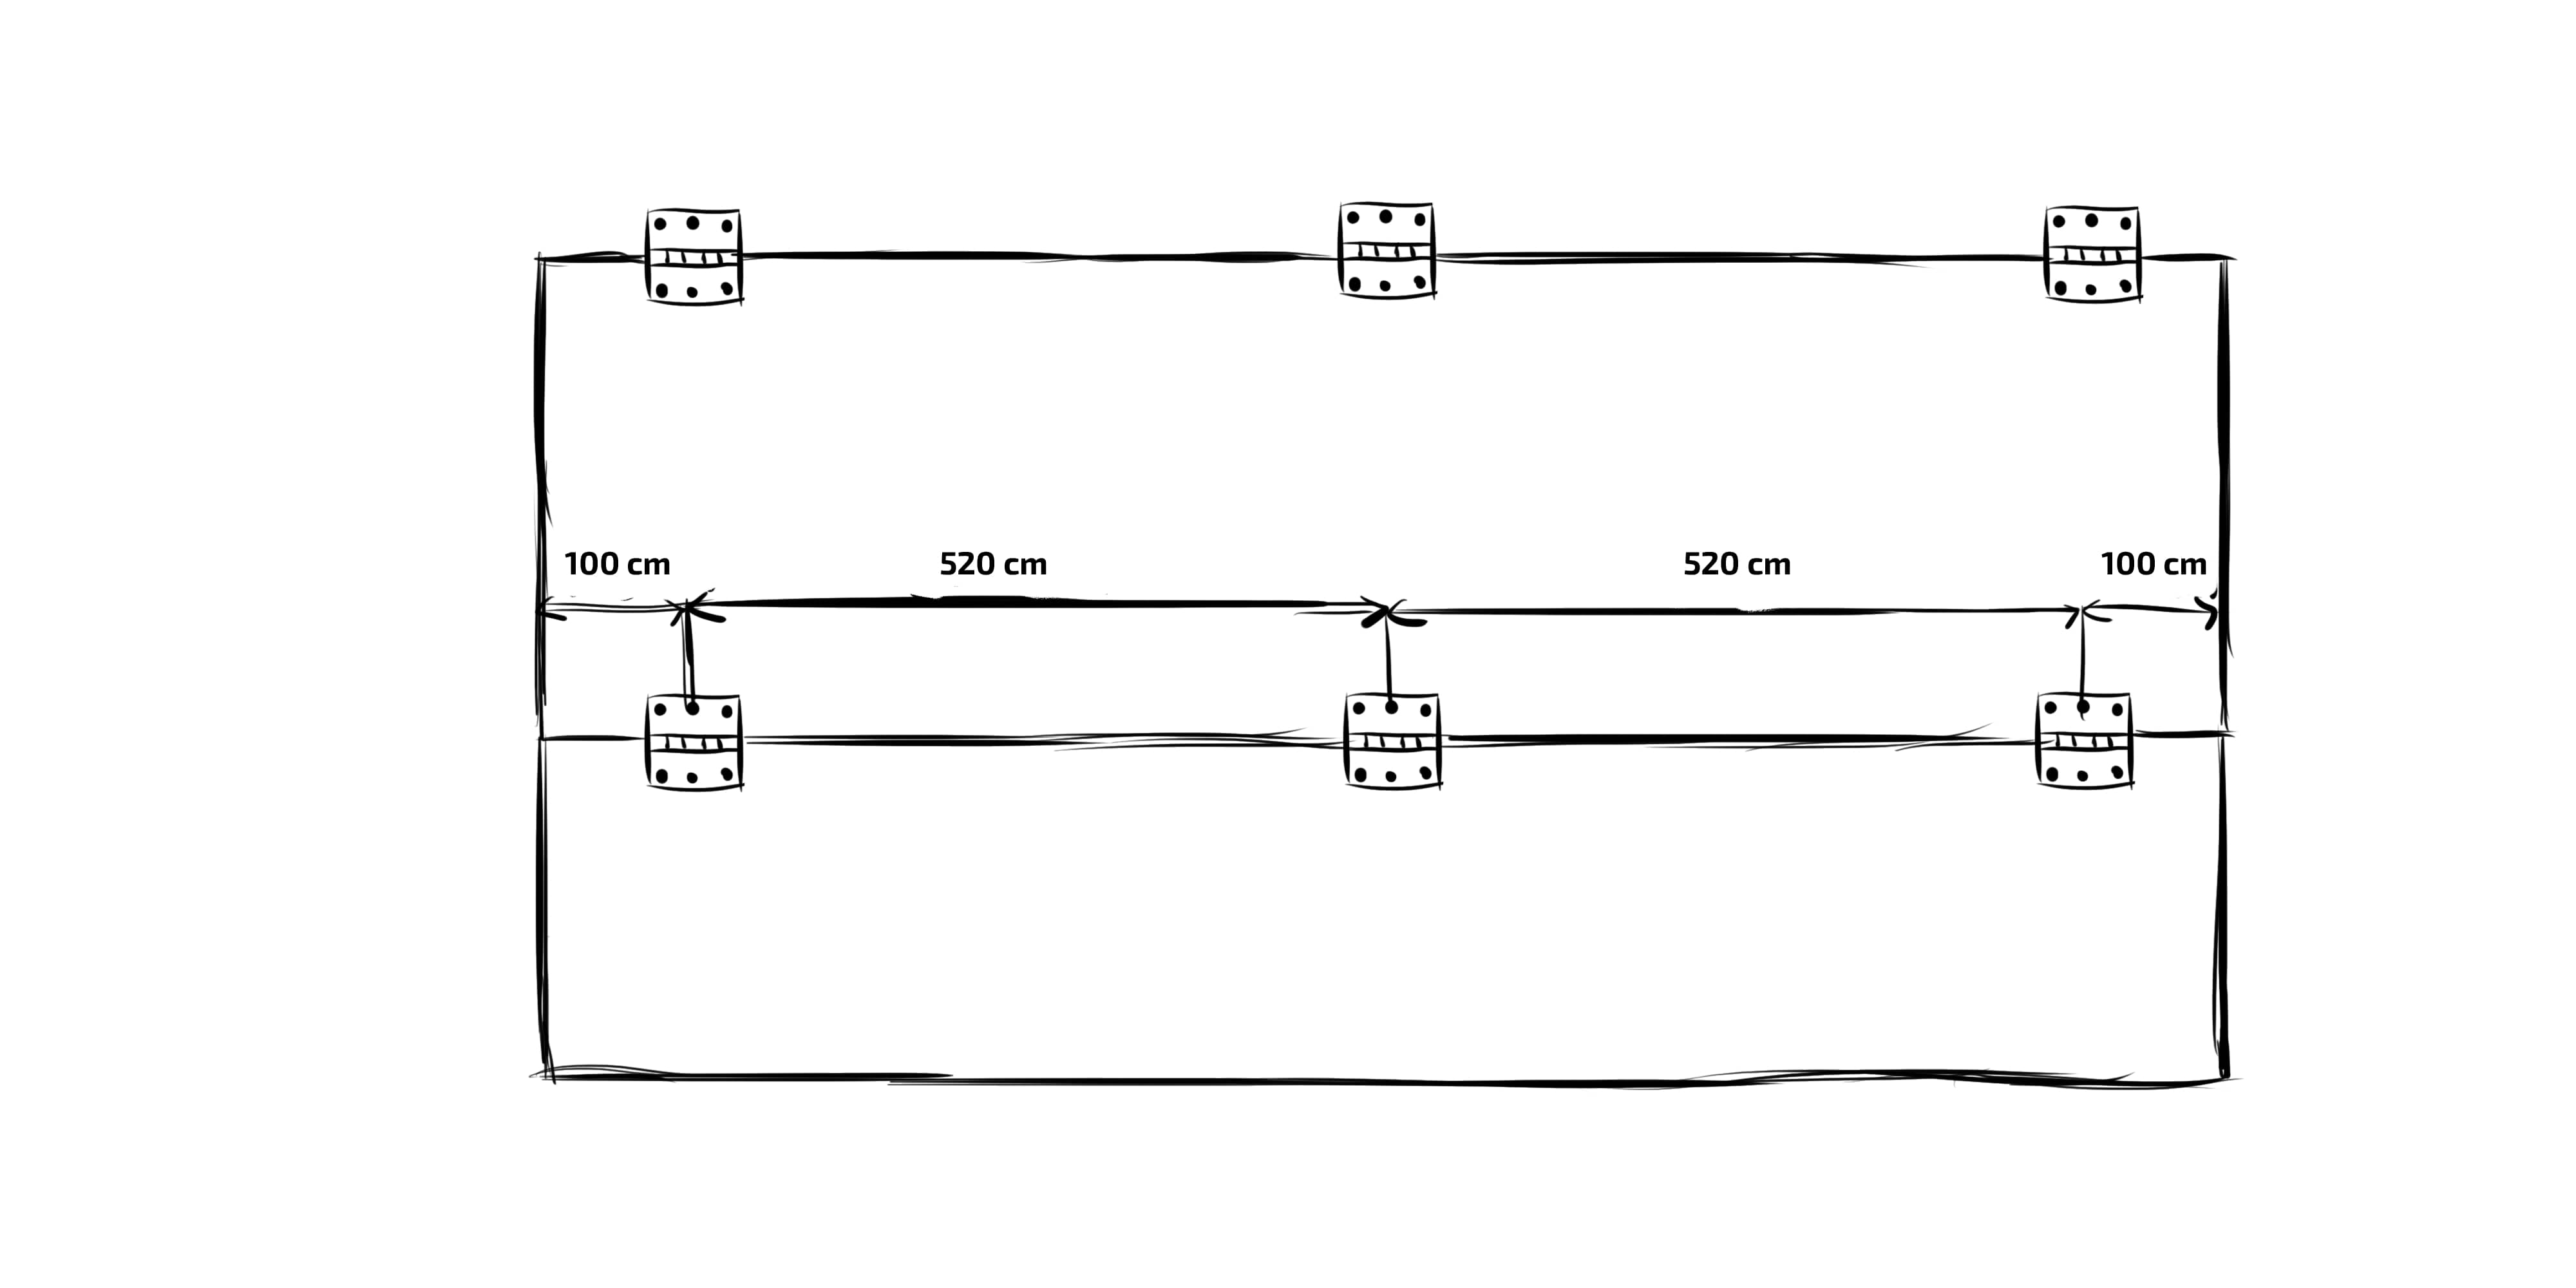
Step 1: Precutting/Sizing The Materials
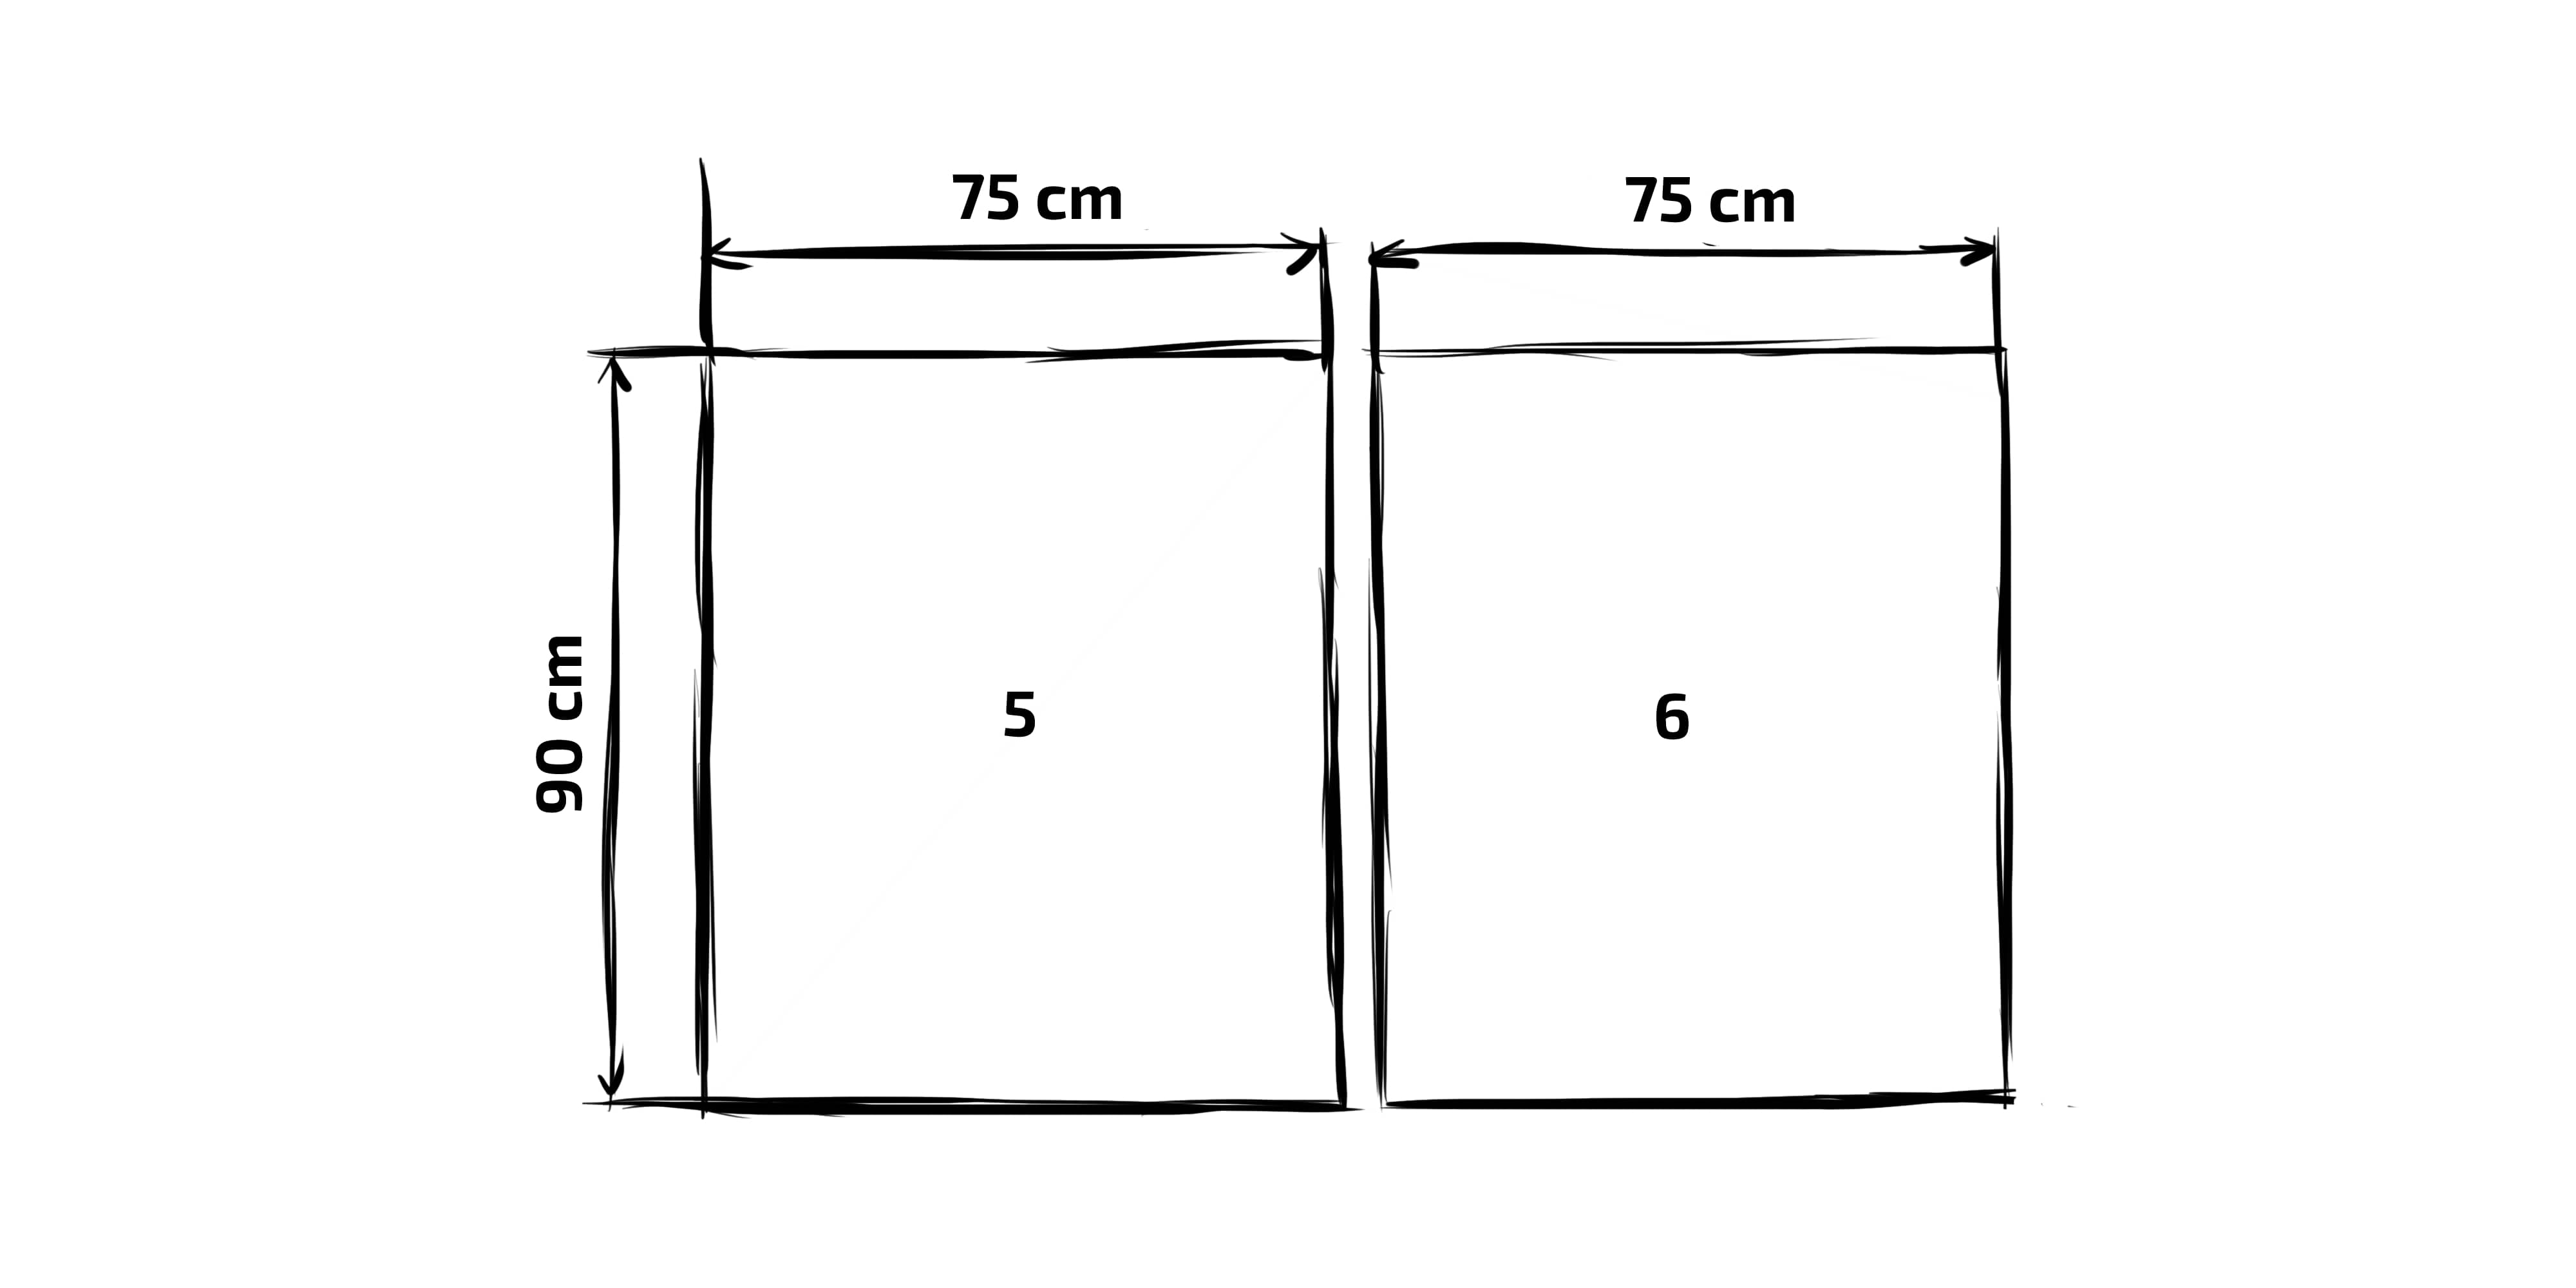
The first step is to cut the materials to the required size. We suggest you get your MDF plate pre-cut and sized at your local construction market. Please follow the drawings for the backplate (1), the bottom plate (2), the top plate (3), the front plate (4), and side plates (5 & 6). Make sure they are cut accordingly.
While you can always use other plating materials to reduce the weight of your ventilating device, we advise you to adjust the size of the plates accordingly. Cut and size the Plexiglas following the drawings. If you can’t get the Plexiglas pre-cut at the construction market, you can always do it yourself with a jigsaw (fine saw blade). We suggest you pre-cut the sawing line on the Plexiglas surface with a utility knife to prevent the Plexiglas from breaking. You must have good support for the plate as you cut.
Ideally, we suggest you get the Plexiglas precut at the construction market; however, you can also buy it online if it’s unavailable.
Note: We strictly recommend that you buy molded Plexiglas instead of the extruded Plexiglas, as the latter could break because of internal stress while post-processing.
Materials Needed:
- 1x MDF 2440 x 1220 x 18mm
- 1x MDF 2400 x 1220 x 18mm
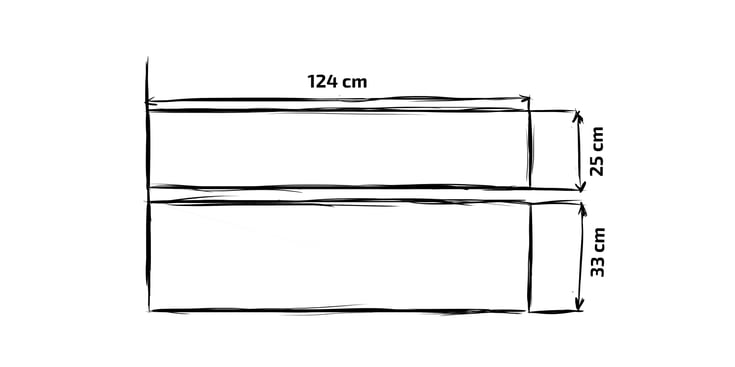
- 1x Plexiglas 124 x 33 x 0.6cm
- 1x Plexiglas 124 x 25 x 0.6cm
Step 2: Cutting The Edges
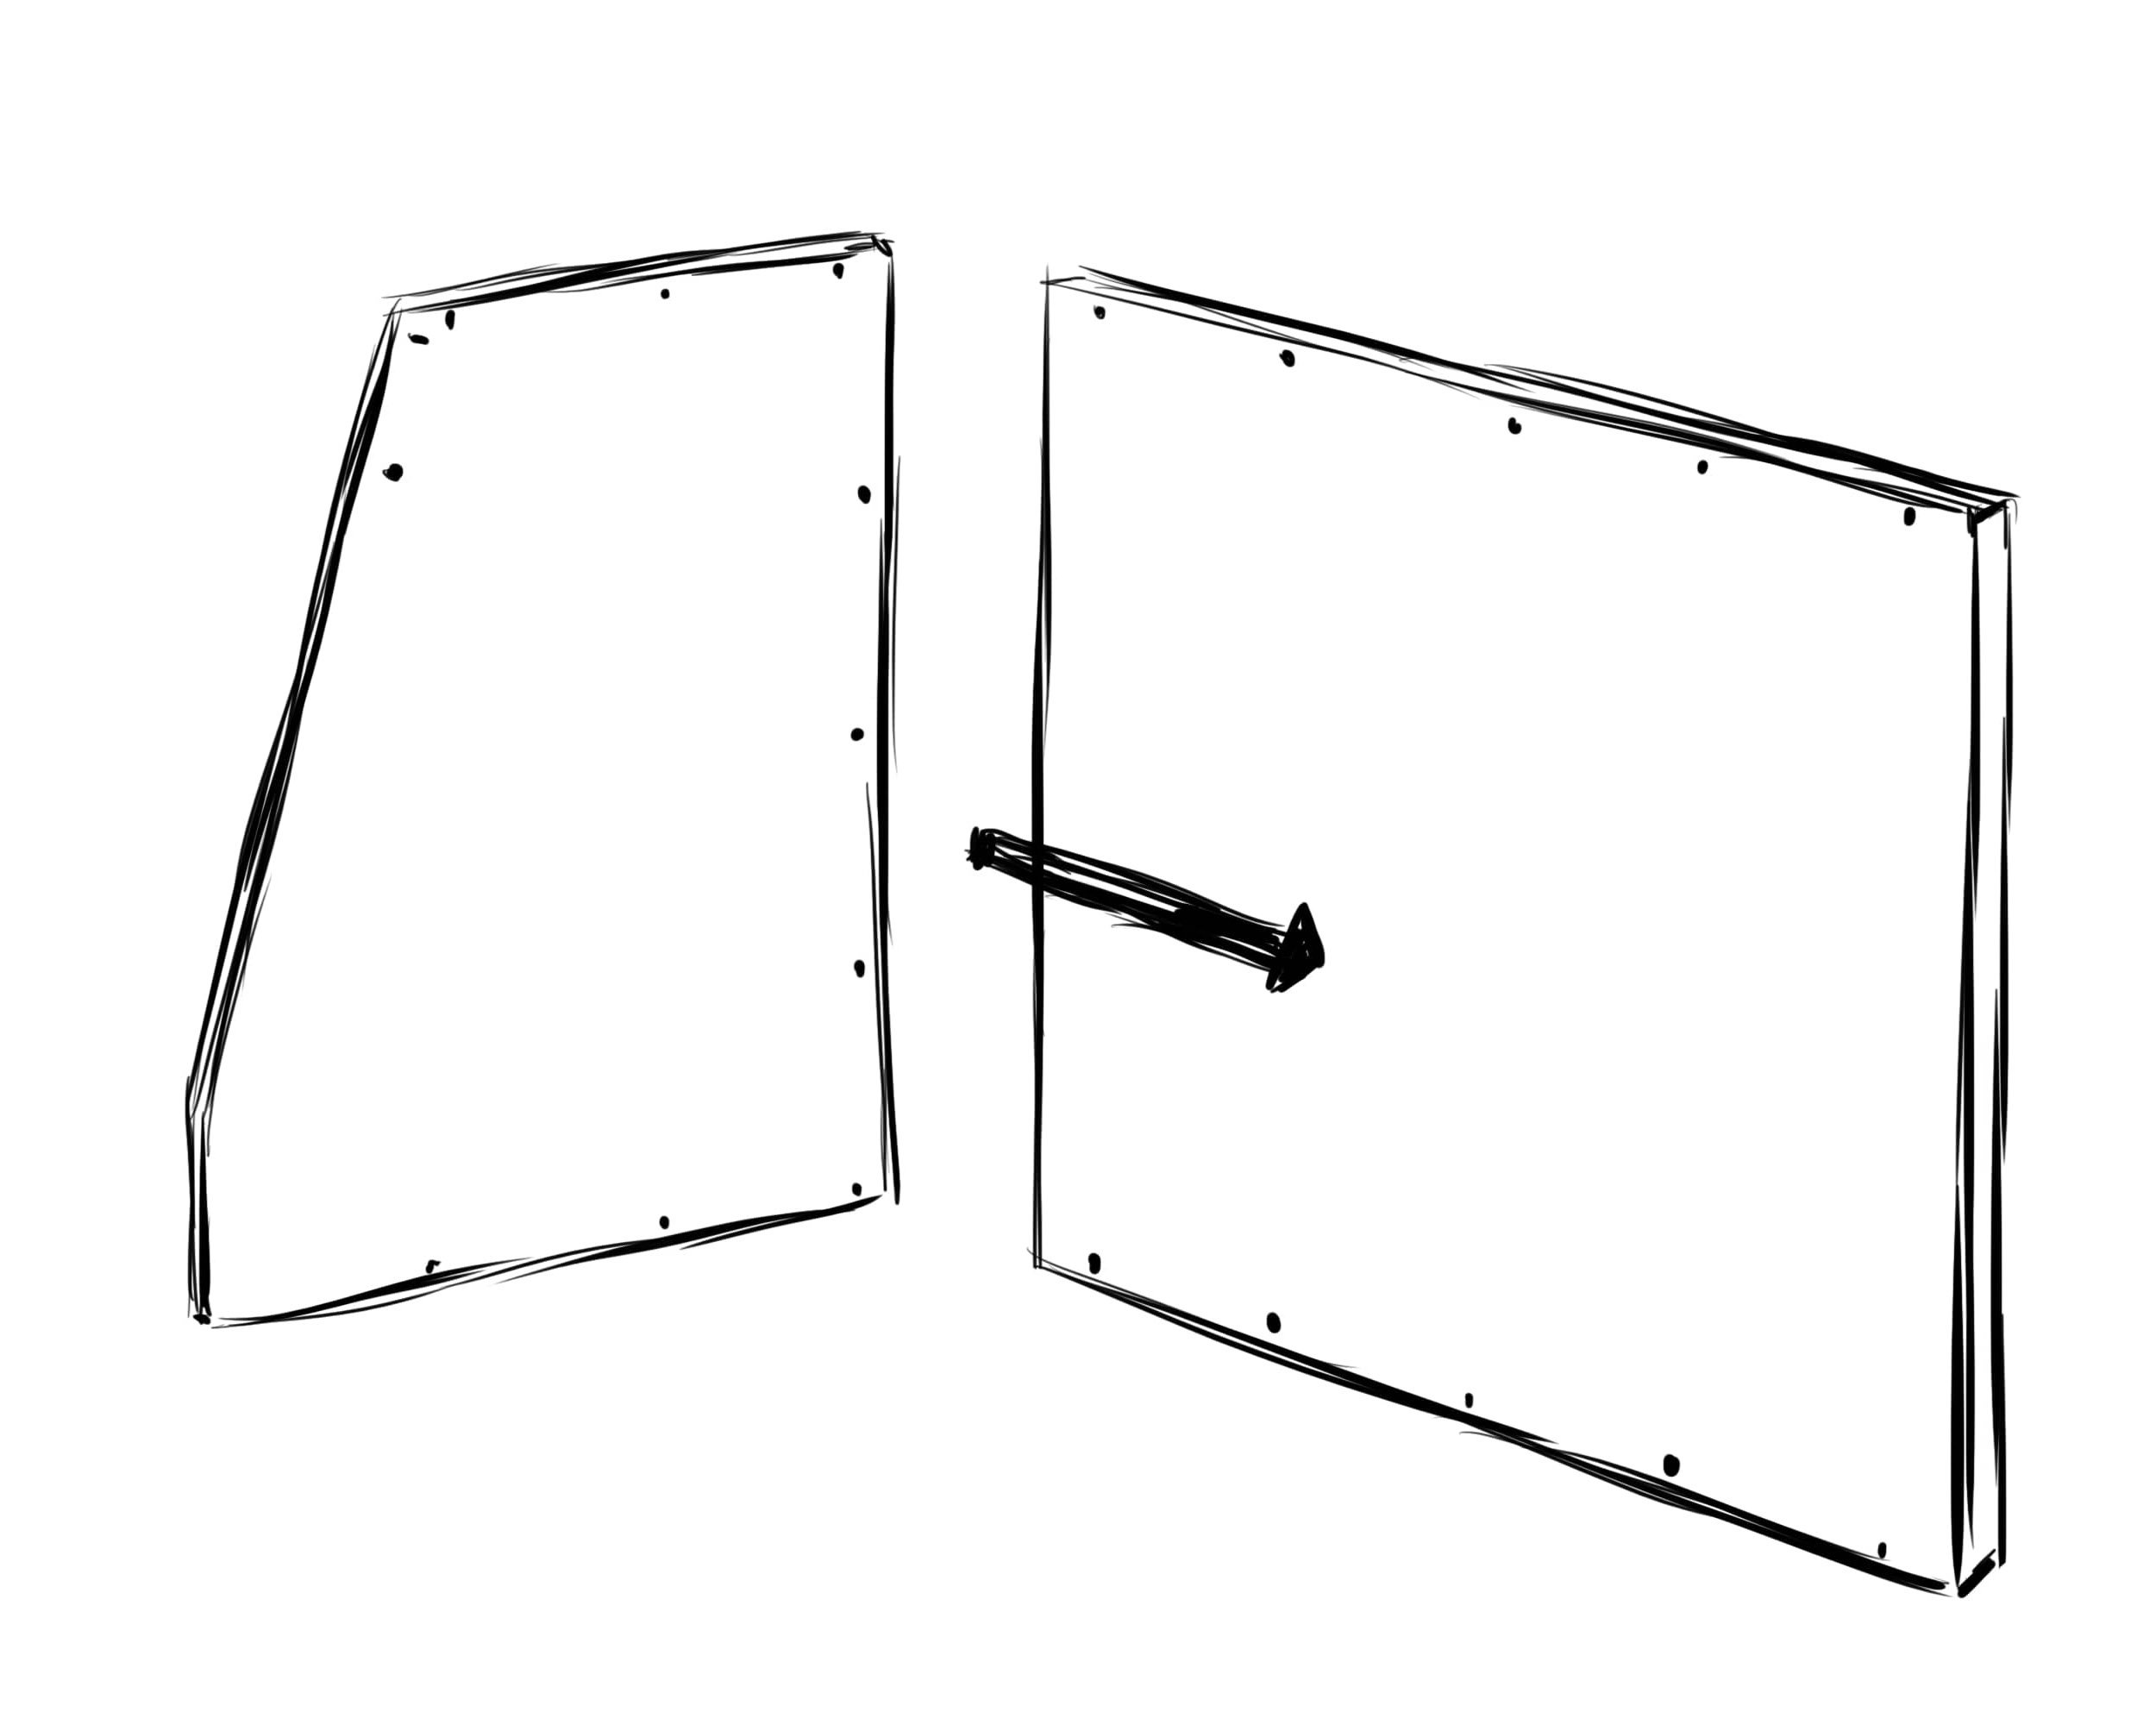
Once you’ve got the materials precut and sized, the next step is to cut the edges. Draw a line as pictured in the drawing and use the jigsaw to cut an angle in the side plates. Be sure to use the workbench to support the plate. Start with a point 20 cm from the bottom, followed by one 54cm to the left of the top. Connect the two by drawing a line from points 1 to 2. Use the jigsaw (with a wood saw) and follow the line. Try to cut at a constant speed. You can use the side of a plate to make a straight cut. Repeat the process for the other plate.
Materials Needed:
- Plate 5 & 6 (75 x 90cm)
- Jigsaw
- 2 x Trestle or a Workbench
- Try square/measuring Tape
- Pencil
Warning: Notice that any use of equipment can be dangerous if not operated properly. Please be responsible while operating the equipment. Make sure you read and follow the safety instructions and signs that you find in the user manual of the tools. Please avoid using any tool if you don’t have prior experience using it.

Customize Your 3D Printing Game!
Unlock Limitless Possibilities with Our Filament Extruder! Empower your 3D printing journey by creating personalized filaments.
Step 3: Drilling Holes
Now that you’ve got the edges appropriately cut, we can start with drilling holes. Get a handheld drill to make holes for the screws in the side plates 5 and 6. Make sure the holes are placed 1cm from the sides. Now, use a wood drill to make 3mm holes. If you use other screws or plates of different thicknesses, make sure you recalculate the distance of the holes from the center.
Materials Needed:
- Plate 5 & 6 (75 x 90cm)
- 3mm Wood Drill
- Handheld Drill
- Measuring Tape
Please follow the same process for the backplate (1), and you’re good to go to the next step. Just make sure you make the holes accordingly if you’re using any other material for the backplate.
Materials Needed:
- Plate 1 (90 x 120 x 1.8cm)
- 3mm Wood Drill
- Handheld Drill
- Measuring Tape
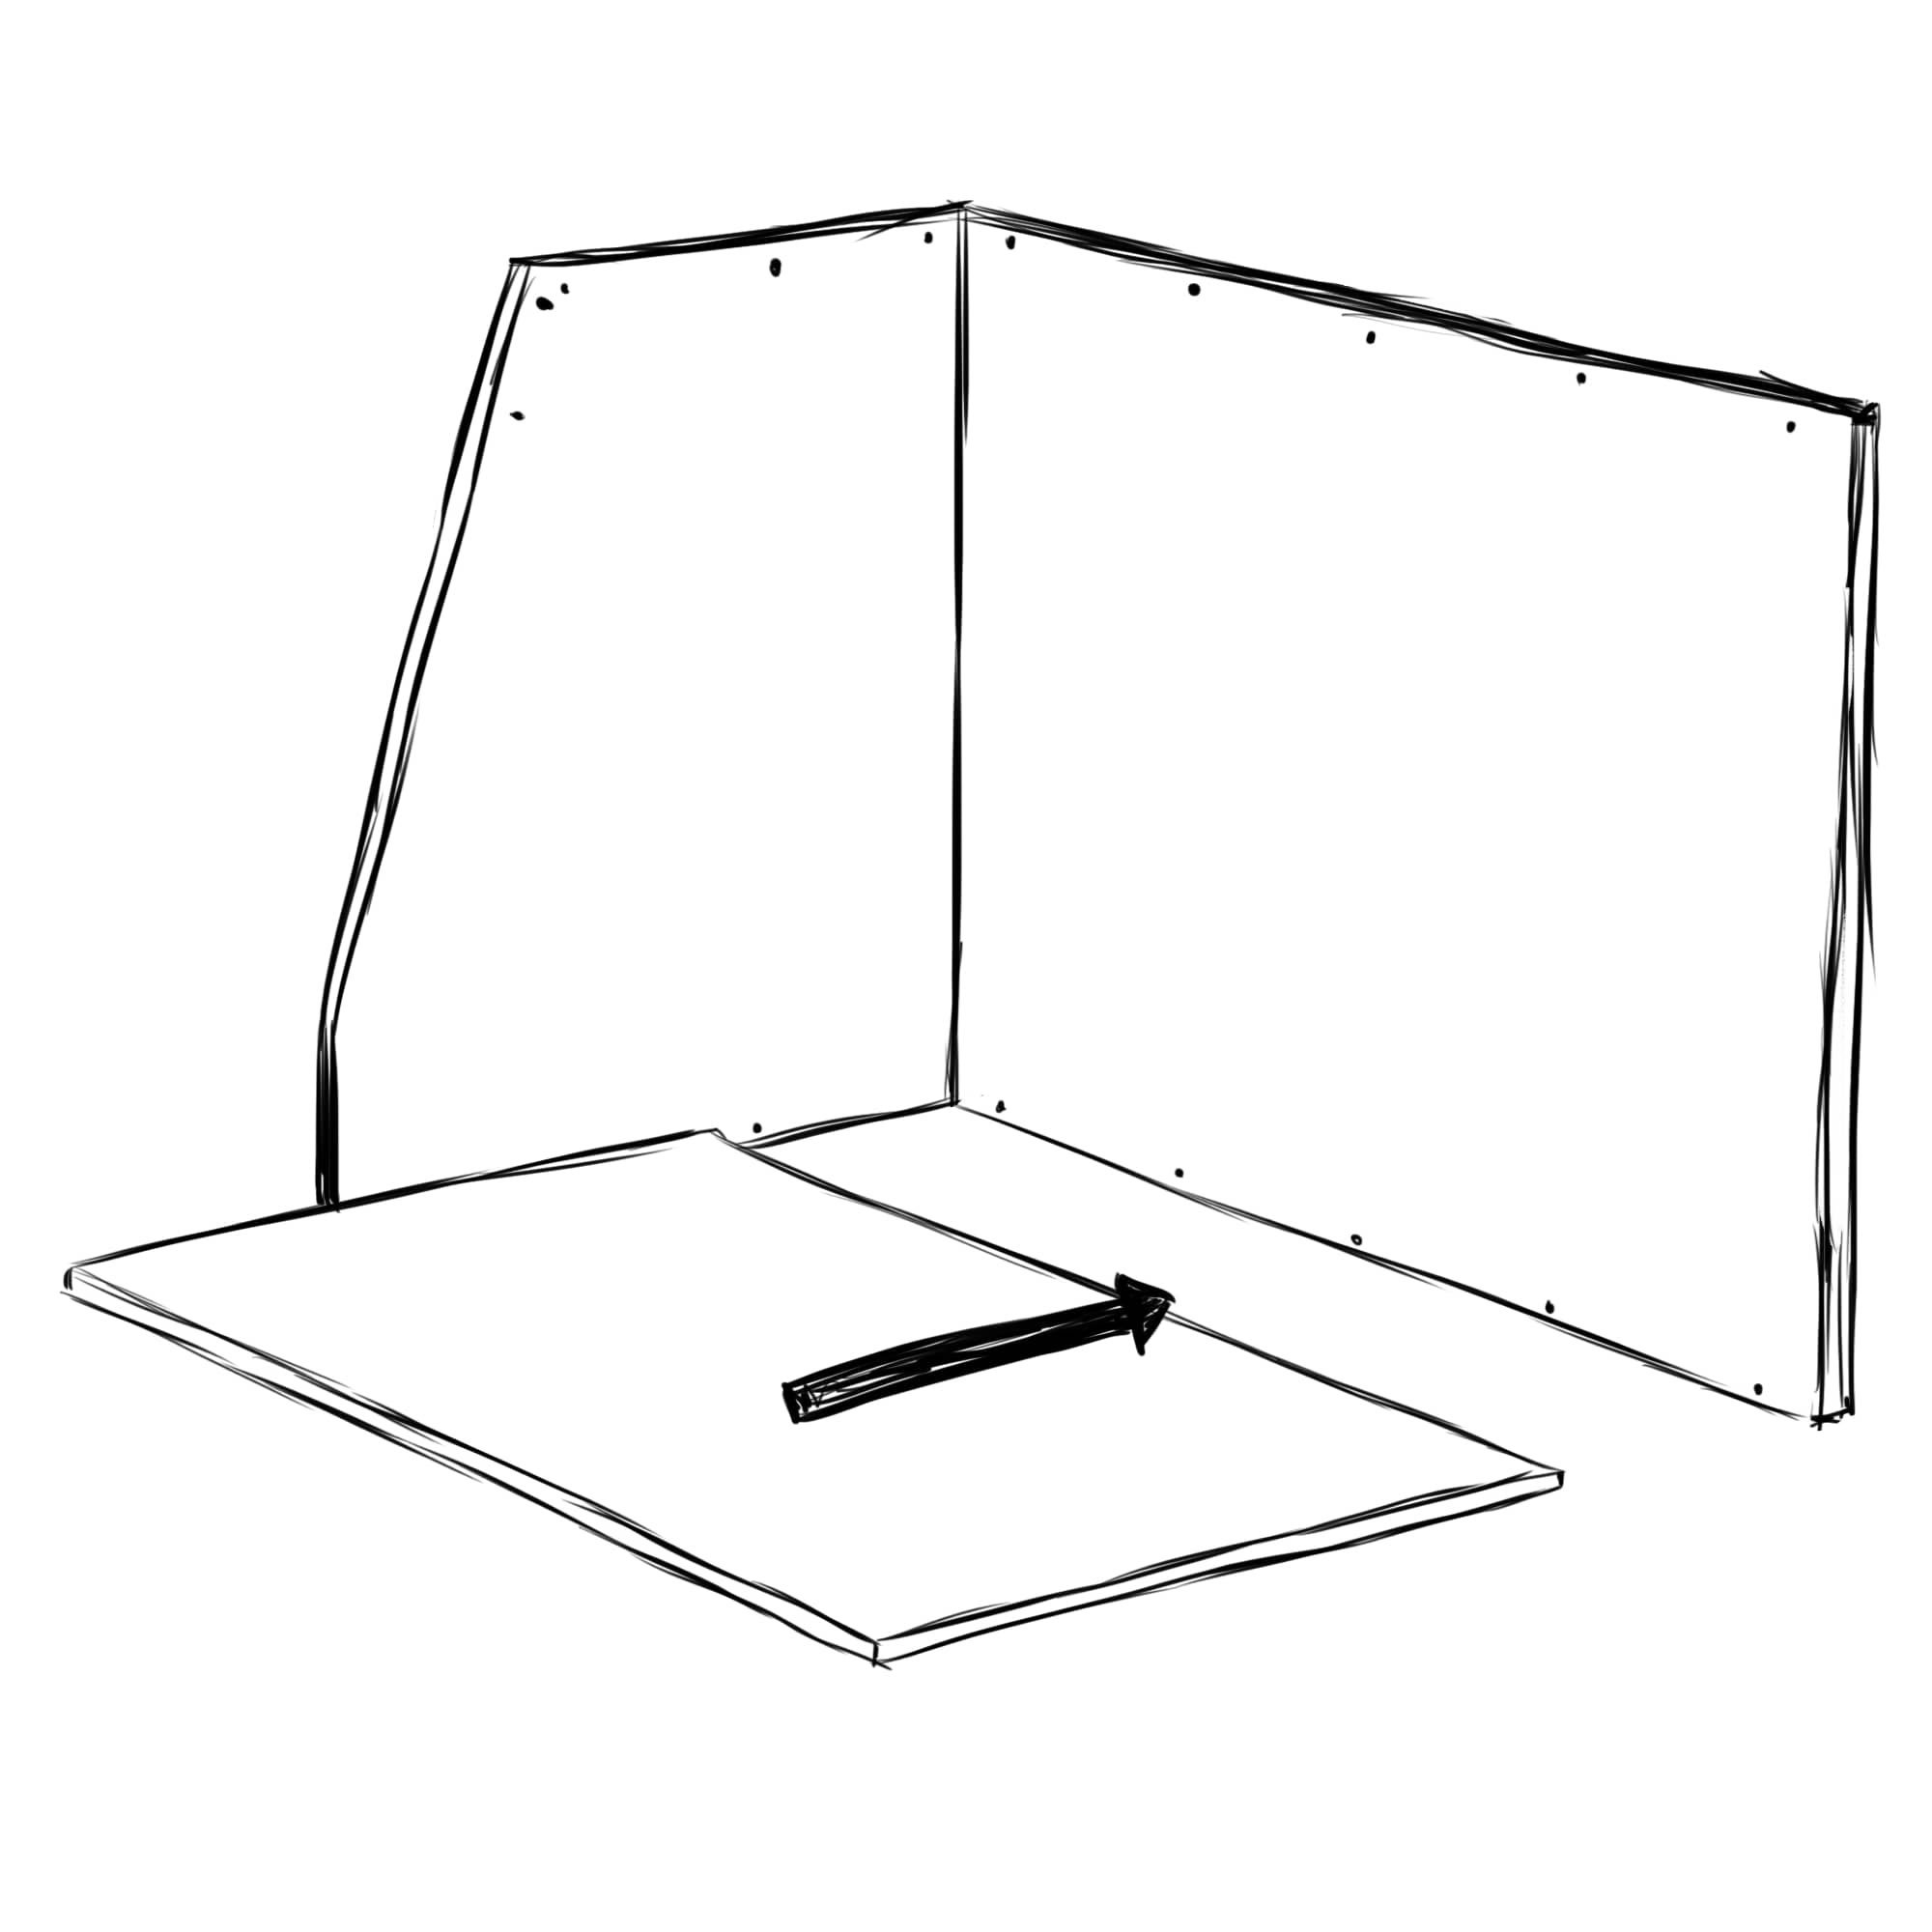
Step 4: Assembling the Frame (Part 1)
The edges are cut, and we’ve drilled the plates; now it’s time to assemble the frame – you can see how it is beginning to take shape.
To assemble the frame, use the handheld drill to predrill holes into the side plate to avoid the MDF from splitting. Mount the side plate (5) to the backplate (1) with 40mm screws.
Materials Needed:
- Plate 1 (90 x 120 x 1.8cm)
- 5x Screws (4.0 x 40mm)
- 3mm Wood Drill
- ph2 Bit
- Handheld Drill
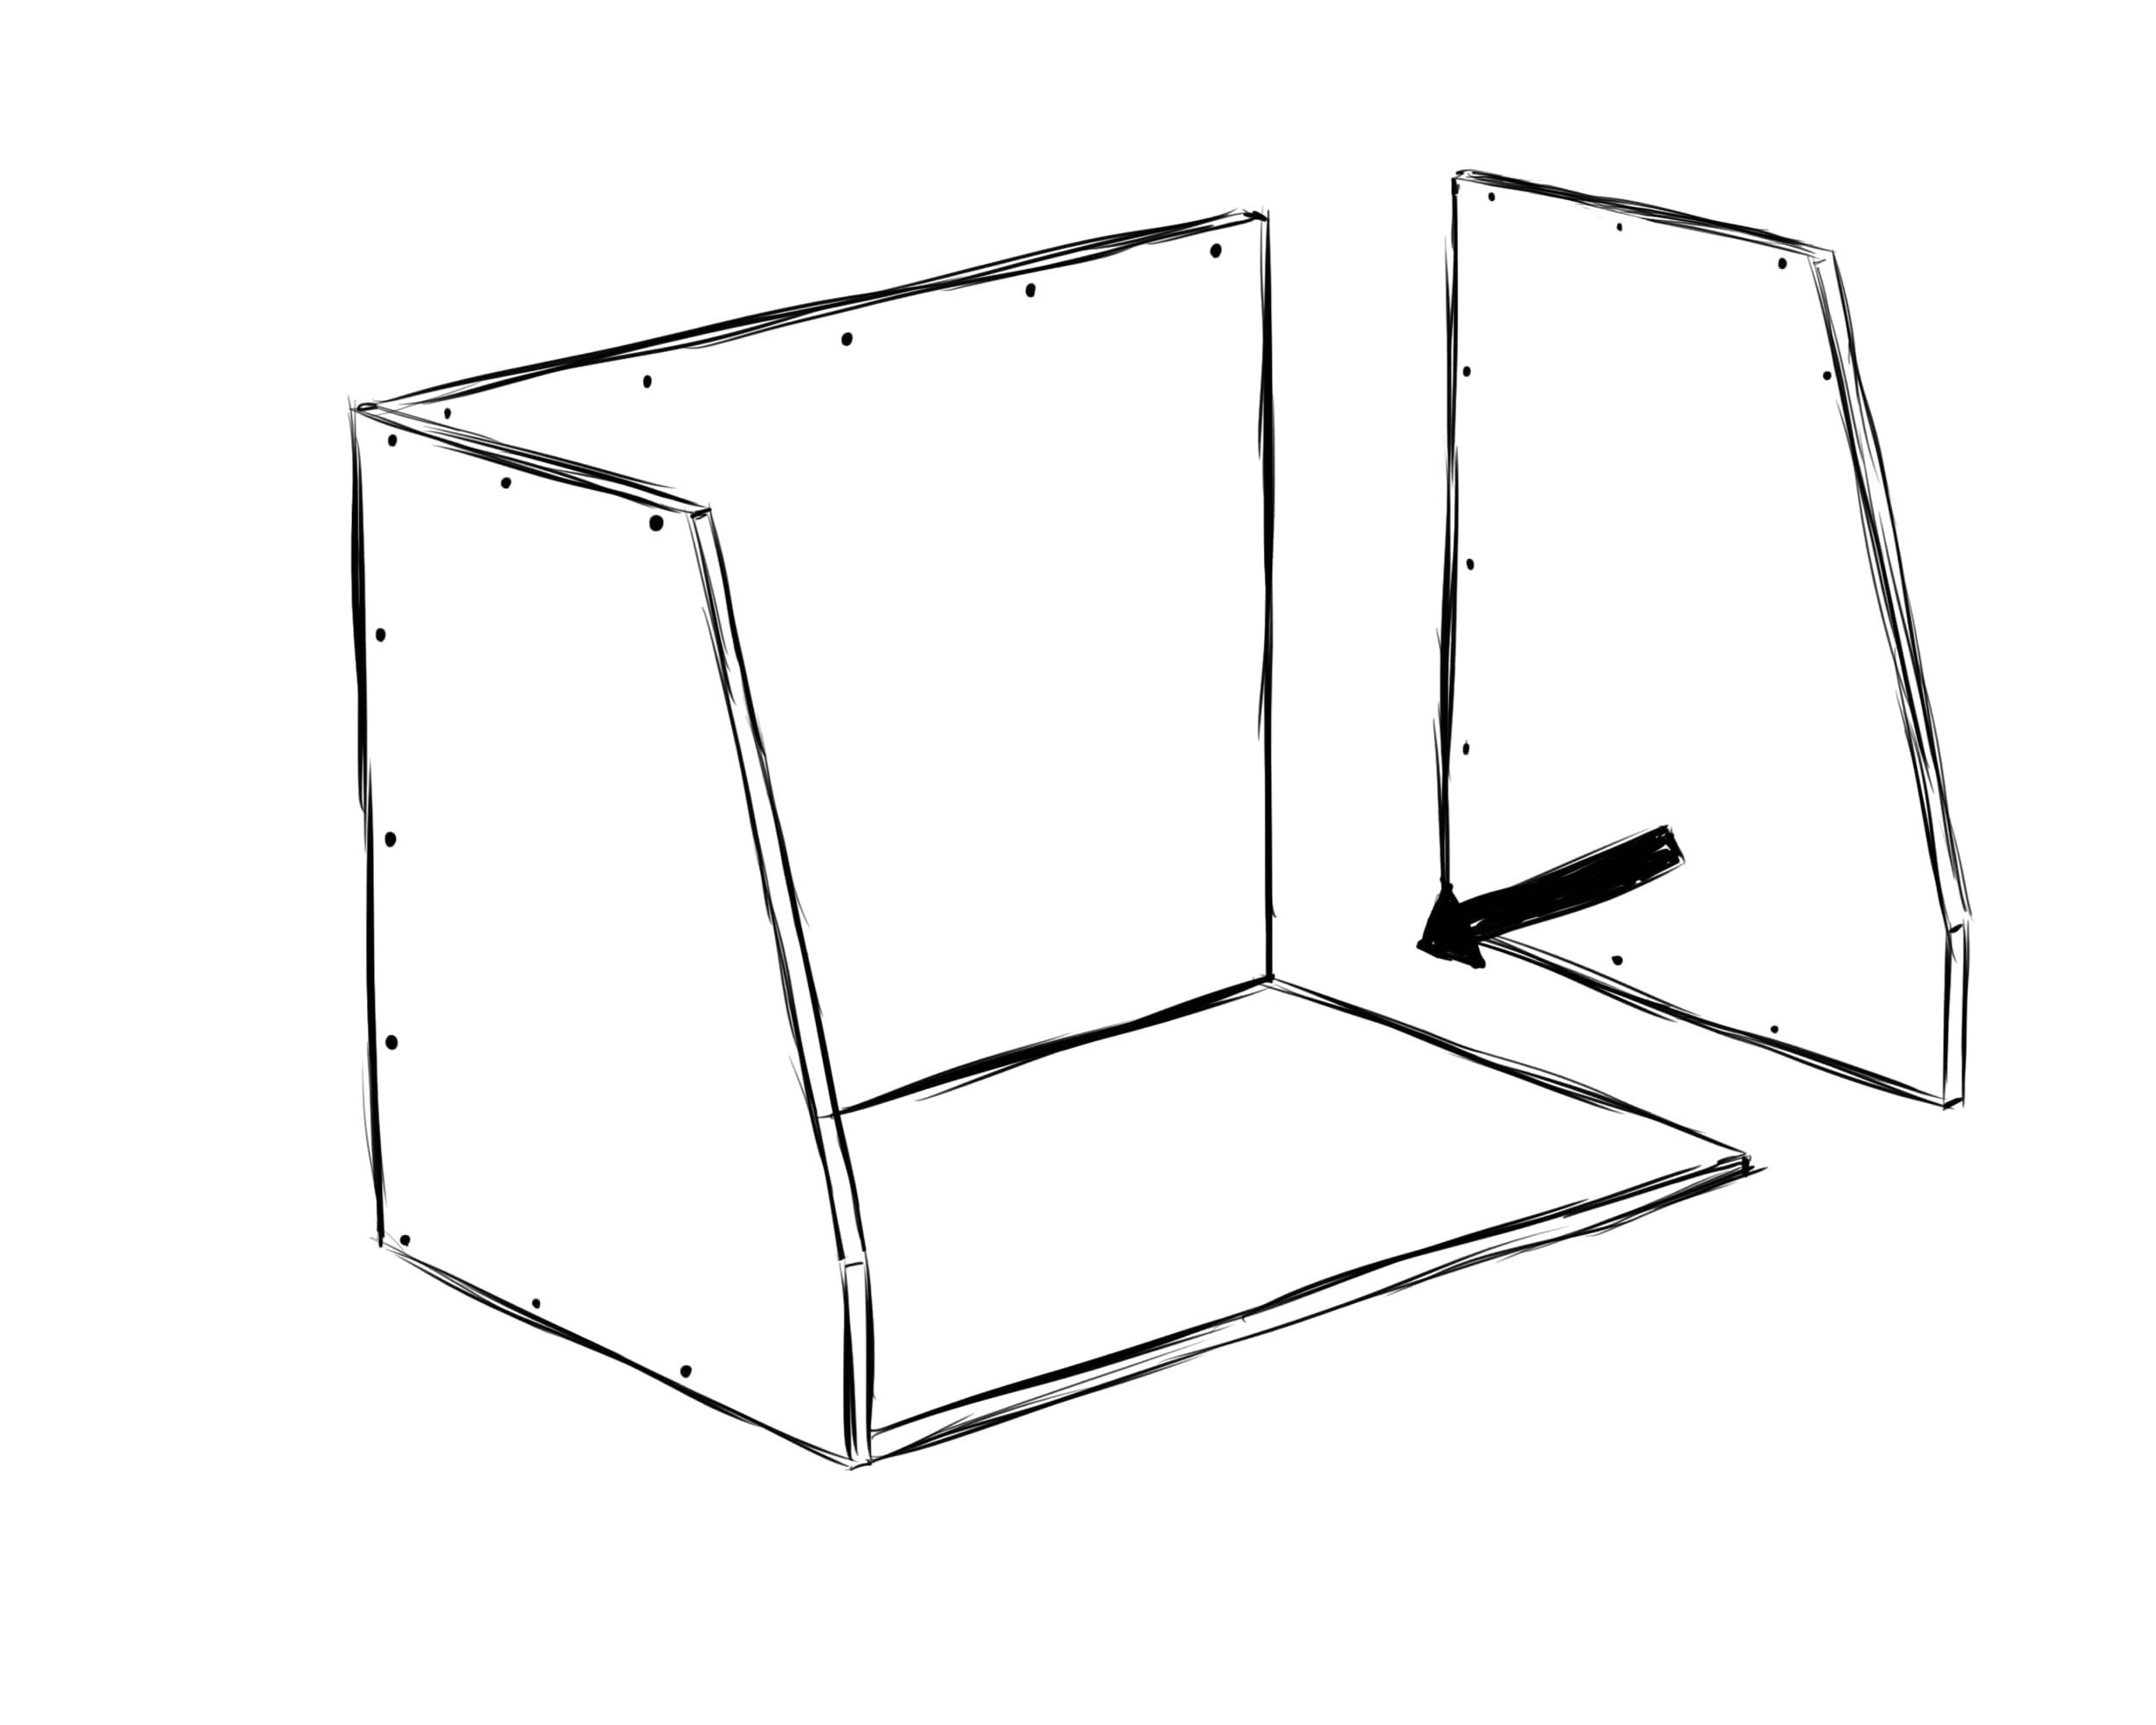
Step 5: Assembling the Frame (Part 2)
 Use the handheld drill to predrill holes into the other plates. Insert the screws from the side plate (5) and backplate (1) into the bottom plate (2).
Materials Needed:
- Plate 2 (120 x 50.5 x 1.8cm)
- 9x Screws (4.0 x 40mm)
- 3mm Wood Drill
- ph2 Bit
- Handheld Drill
Step 6: Assembling the Frame (Part 3)
 Please follow the instructions above to make holes in the remaining plates. Now, insert the second side plate (6) into the backplate (1) and bottom plate (2) with screws.
Materials Needed:
- Plate 6 (75 x 90 x 1.8cm)
- 8x Screws (4.0 x 40mm)
- 3mm Wood Drill
- ph2 Bit
- Handheld Drill
Excited? Let’s get to the next step: making a ventilation hole.
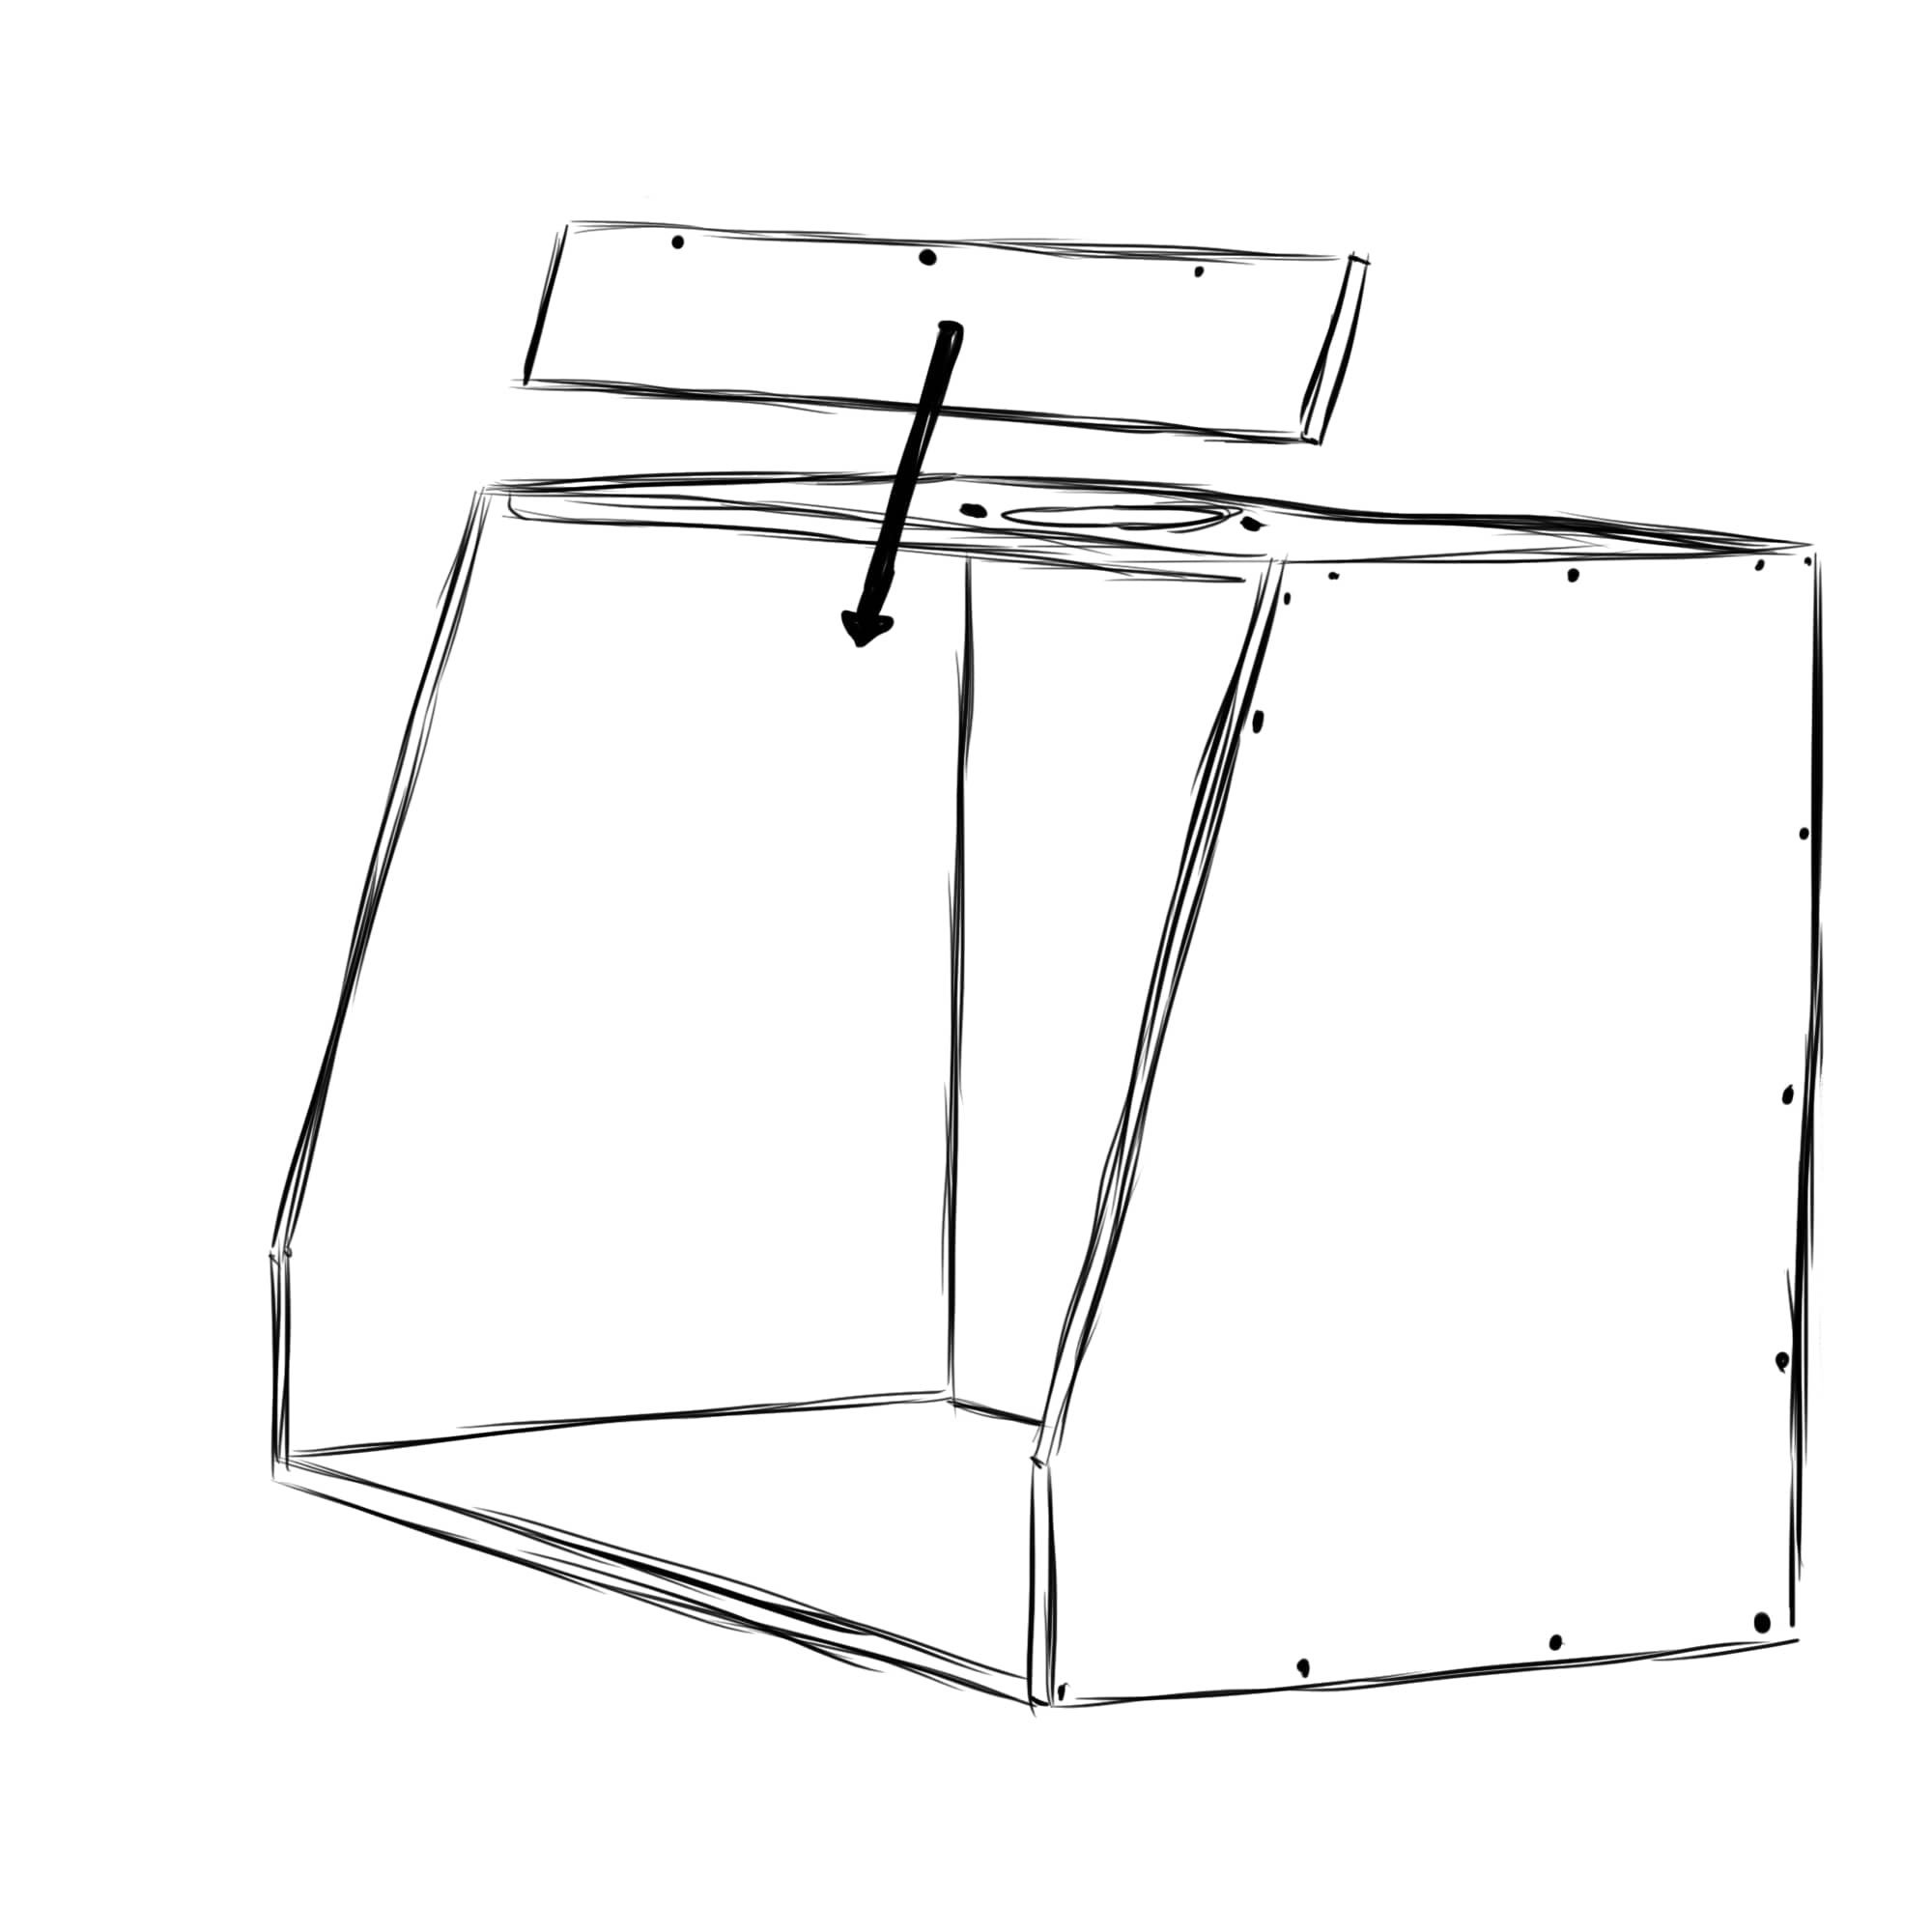
Step 7: Cutting The Ventilation Hole
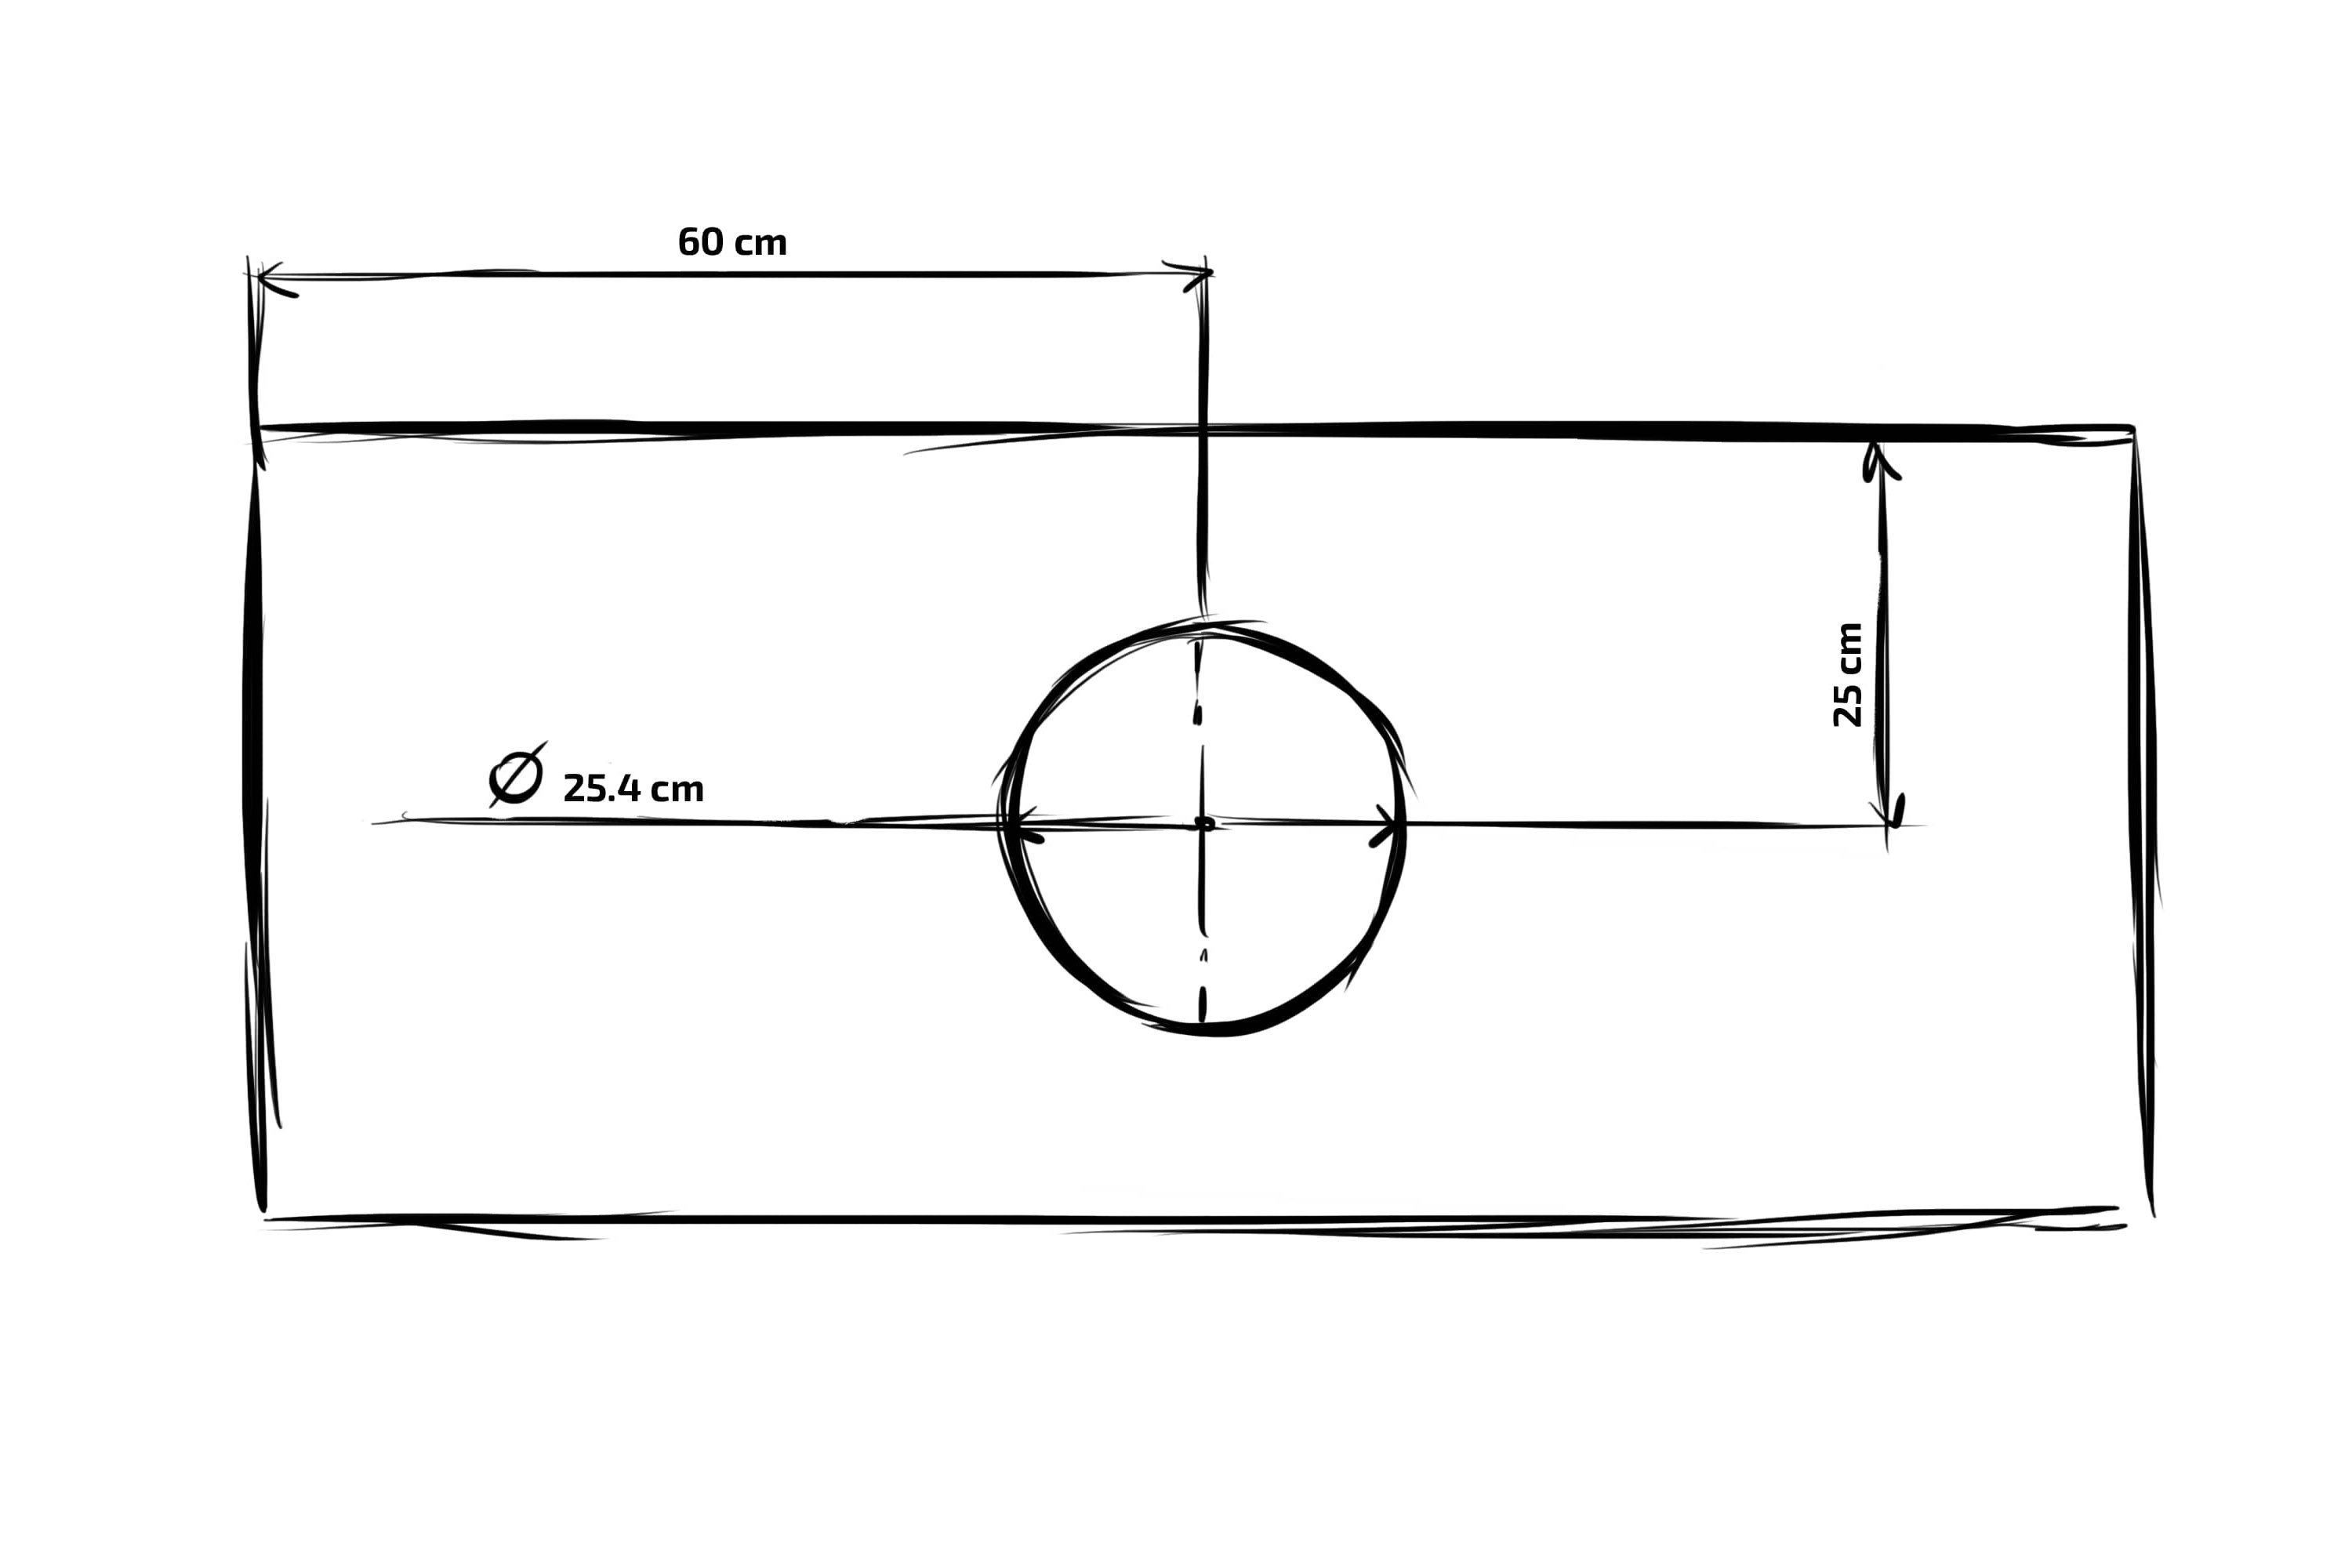 We already have our custom fume hood frame ready. It’s time to cut the ventilation hole. It’s easy. Place the top plate (3) on the workbench and use the diameter of the hose to draw a circle of 25.4cm in the middle of the plate. If you’ve bought another ventilator, adjust the diameter if necessary.
Drill a hole in the circle with a diameter of 22mm (wood drill). Use the jigsaw to cut out the circle of 254mm. Make sure you don’t rush with sharp turns to achieve a smooth and steady cut.
Materials Needed:
- Plate 3 (120 x 50.5 x 1.8cm)
- 22m Wood Drill
- Hose (25.4cm)
- Jigsaw
- Handheld Drill
- Measuring Tape
Step 8: Mounting the LED
The next step is to mount the LED. Start by mounting the LED frame on the top plate with the instructions for the lamp. Make sure to hang the light around 12cm from the top plate for ventilation. Check if the LED works and if it’s mounted in the middle of the top plate. It needs to be at least 12mm off the side edges of the top plate.
Materials Needed:
- Screwdriver PH2
- LED Panel
- Handheld Drill
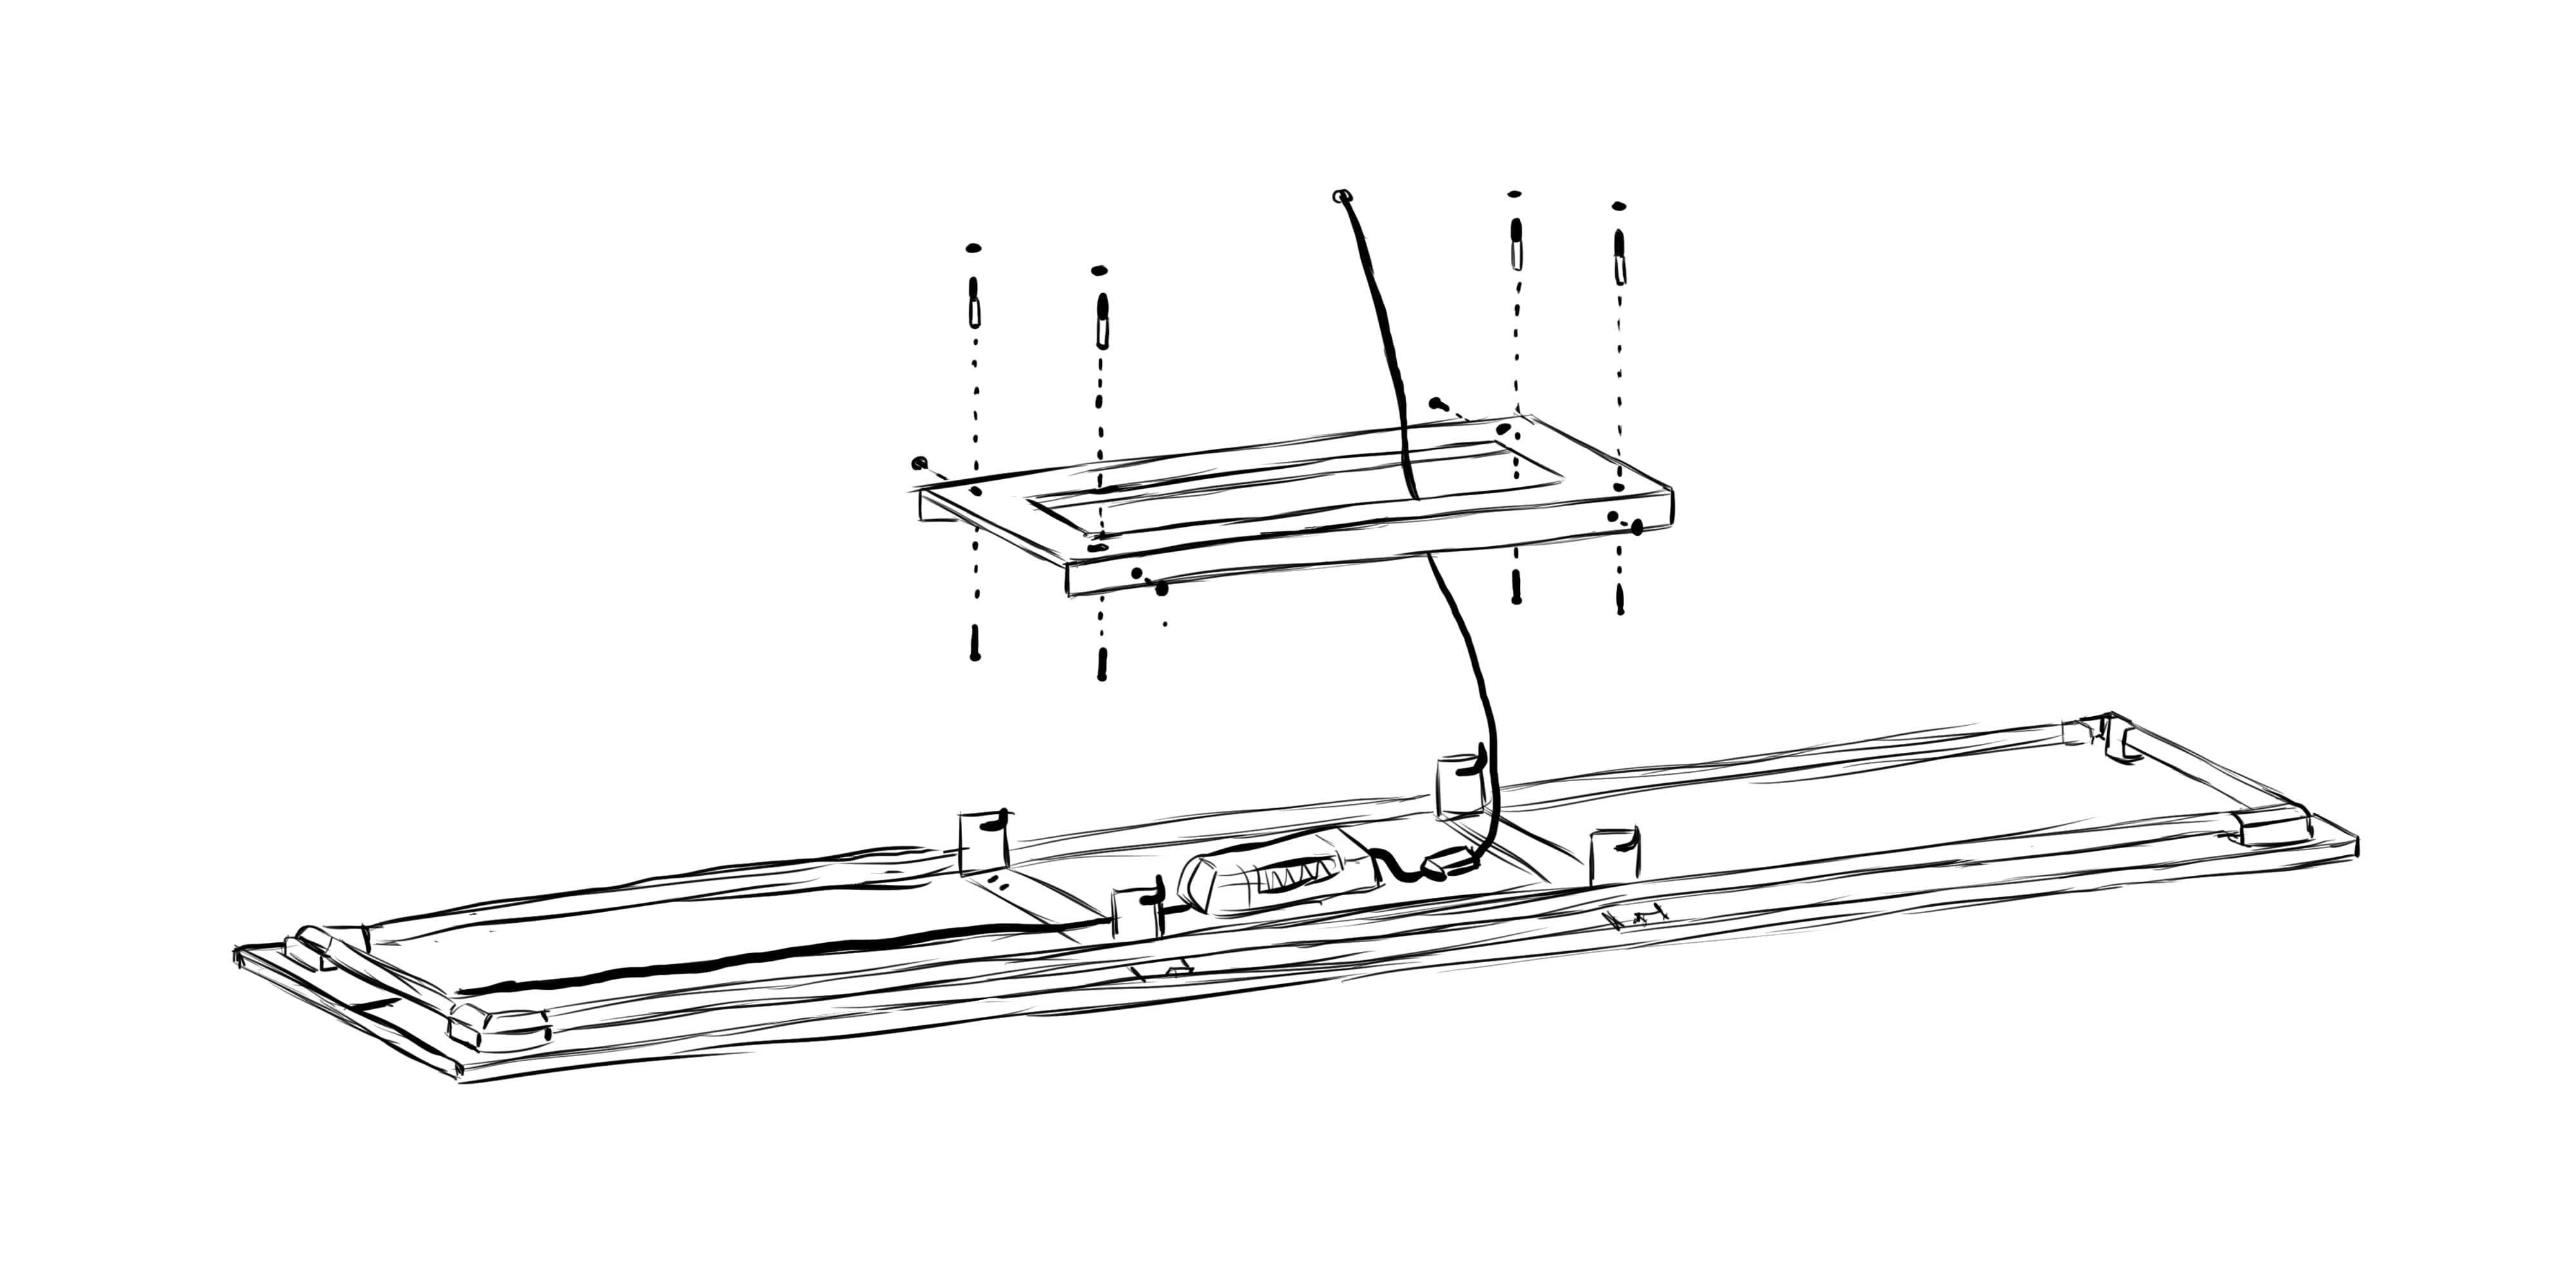
Step 9: Flip The Frame and Mount The Top Plate
You’re already getting closer. After mounting the LED, flip the frame on its back to insert the top plate.
Use the handheld drill to pre-drill the holes before inserting the screws to avoid the MDF from splitting. Insert the screws into the side plate (6), the top plate (3), and the backplate (1). After you have inserted the screws, flip the frame back to normal and insert the screws into the remaining site.
Materials Needed:
- Plate 3 (75 x 90 x 1.8cm)
- 9x Screws 4.0 x 40mm
- 3mm Wood Drill
- ph2 bit
- Handheld Drill
Step 10: Attaching the Front Plate
To attach the front plate, please use the handheld drill to predrill 3mm holes before inserting the screws to avoid the MDF from splitting. Once done, you can mount the front plate on the top and side plates. Before inserting the screws on the front, predrill the top plate using the front plate holes as a reference.
Materials Needed:
- Plate 4 (120 x 15cm)
- 7x Screws 4.0 x 40mm
- 3mm Wood Drill
- Handheld Drill

Step 11: Mounting the Hinges
This step is crucial, and please be careful.
Lay the Plexiglas door plates on a flat surface and adjust the tape over the spots where we will be placing the hinges. Use the try-square to place the Hinges aligned. Once the hinges are aligned, draw points where you’ll set the screws using the hinges as mold.
To avoid breaking the Plexiglas, we advise you to make holes, following one step at a time. Start with a 2mm metal drill and repeat the process with a 3.5- and 5mm drill. If you can adapt to the speed of the handheld drill, we suggest using the fast presets of the machine. A slower drill speed with a bigger drill increases the chances of breaking the Plexiglas.
Materials Needed:
- 6x Hinges 76 x 76mm
- 2, 3.5, and 5mm Metal Drill
- Plexiglas Plates
- Bolts and Nuts M5 x 12
- Wrench 8in
- Handheld Drill
- Tape
- Pencil
Step 12: Mounting the Windows
Now that the hinges are in place, cheer up! We are nearly there.
It’s time to mount the windows, so here we go.
Hold the windows in the front, and draw the points inside of the hinges on the front plate. Make sure the sides are aligned. Use the hand drill with the 5mm wood drill and drill the holes once the windows are aligned. Insert the spacers between the window and the front plate, and tighten the nuts with the wrench and a hex key or hand drill.
By losening up the bolts and nuts, tighten them again. You can align the panels if necessary; however, please don’t forget the spacers between the Plexiglas panel and the front plate, and you’ll be good to go.
Materials Needed:
- 9x Bolts and Nuts M5 x 30
- 5mm Wood Drill
- Spacer 6mm
- Handheld Drill
- Wrench
- Hex Key
Step 13: Mounting the Handles
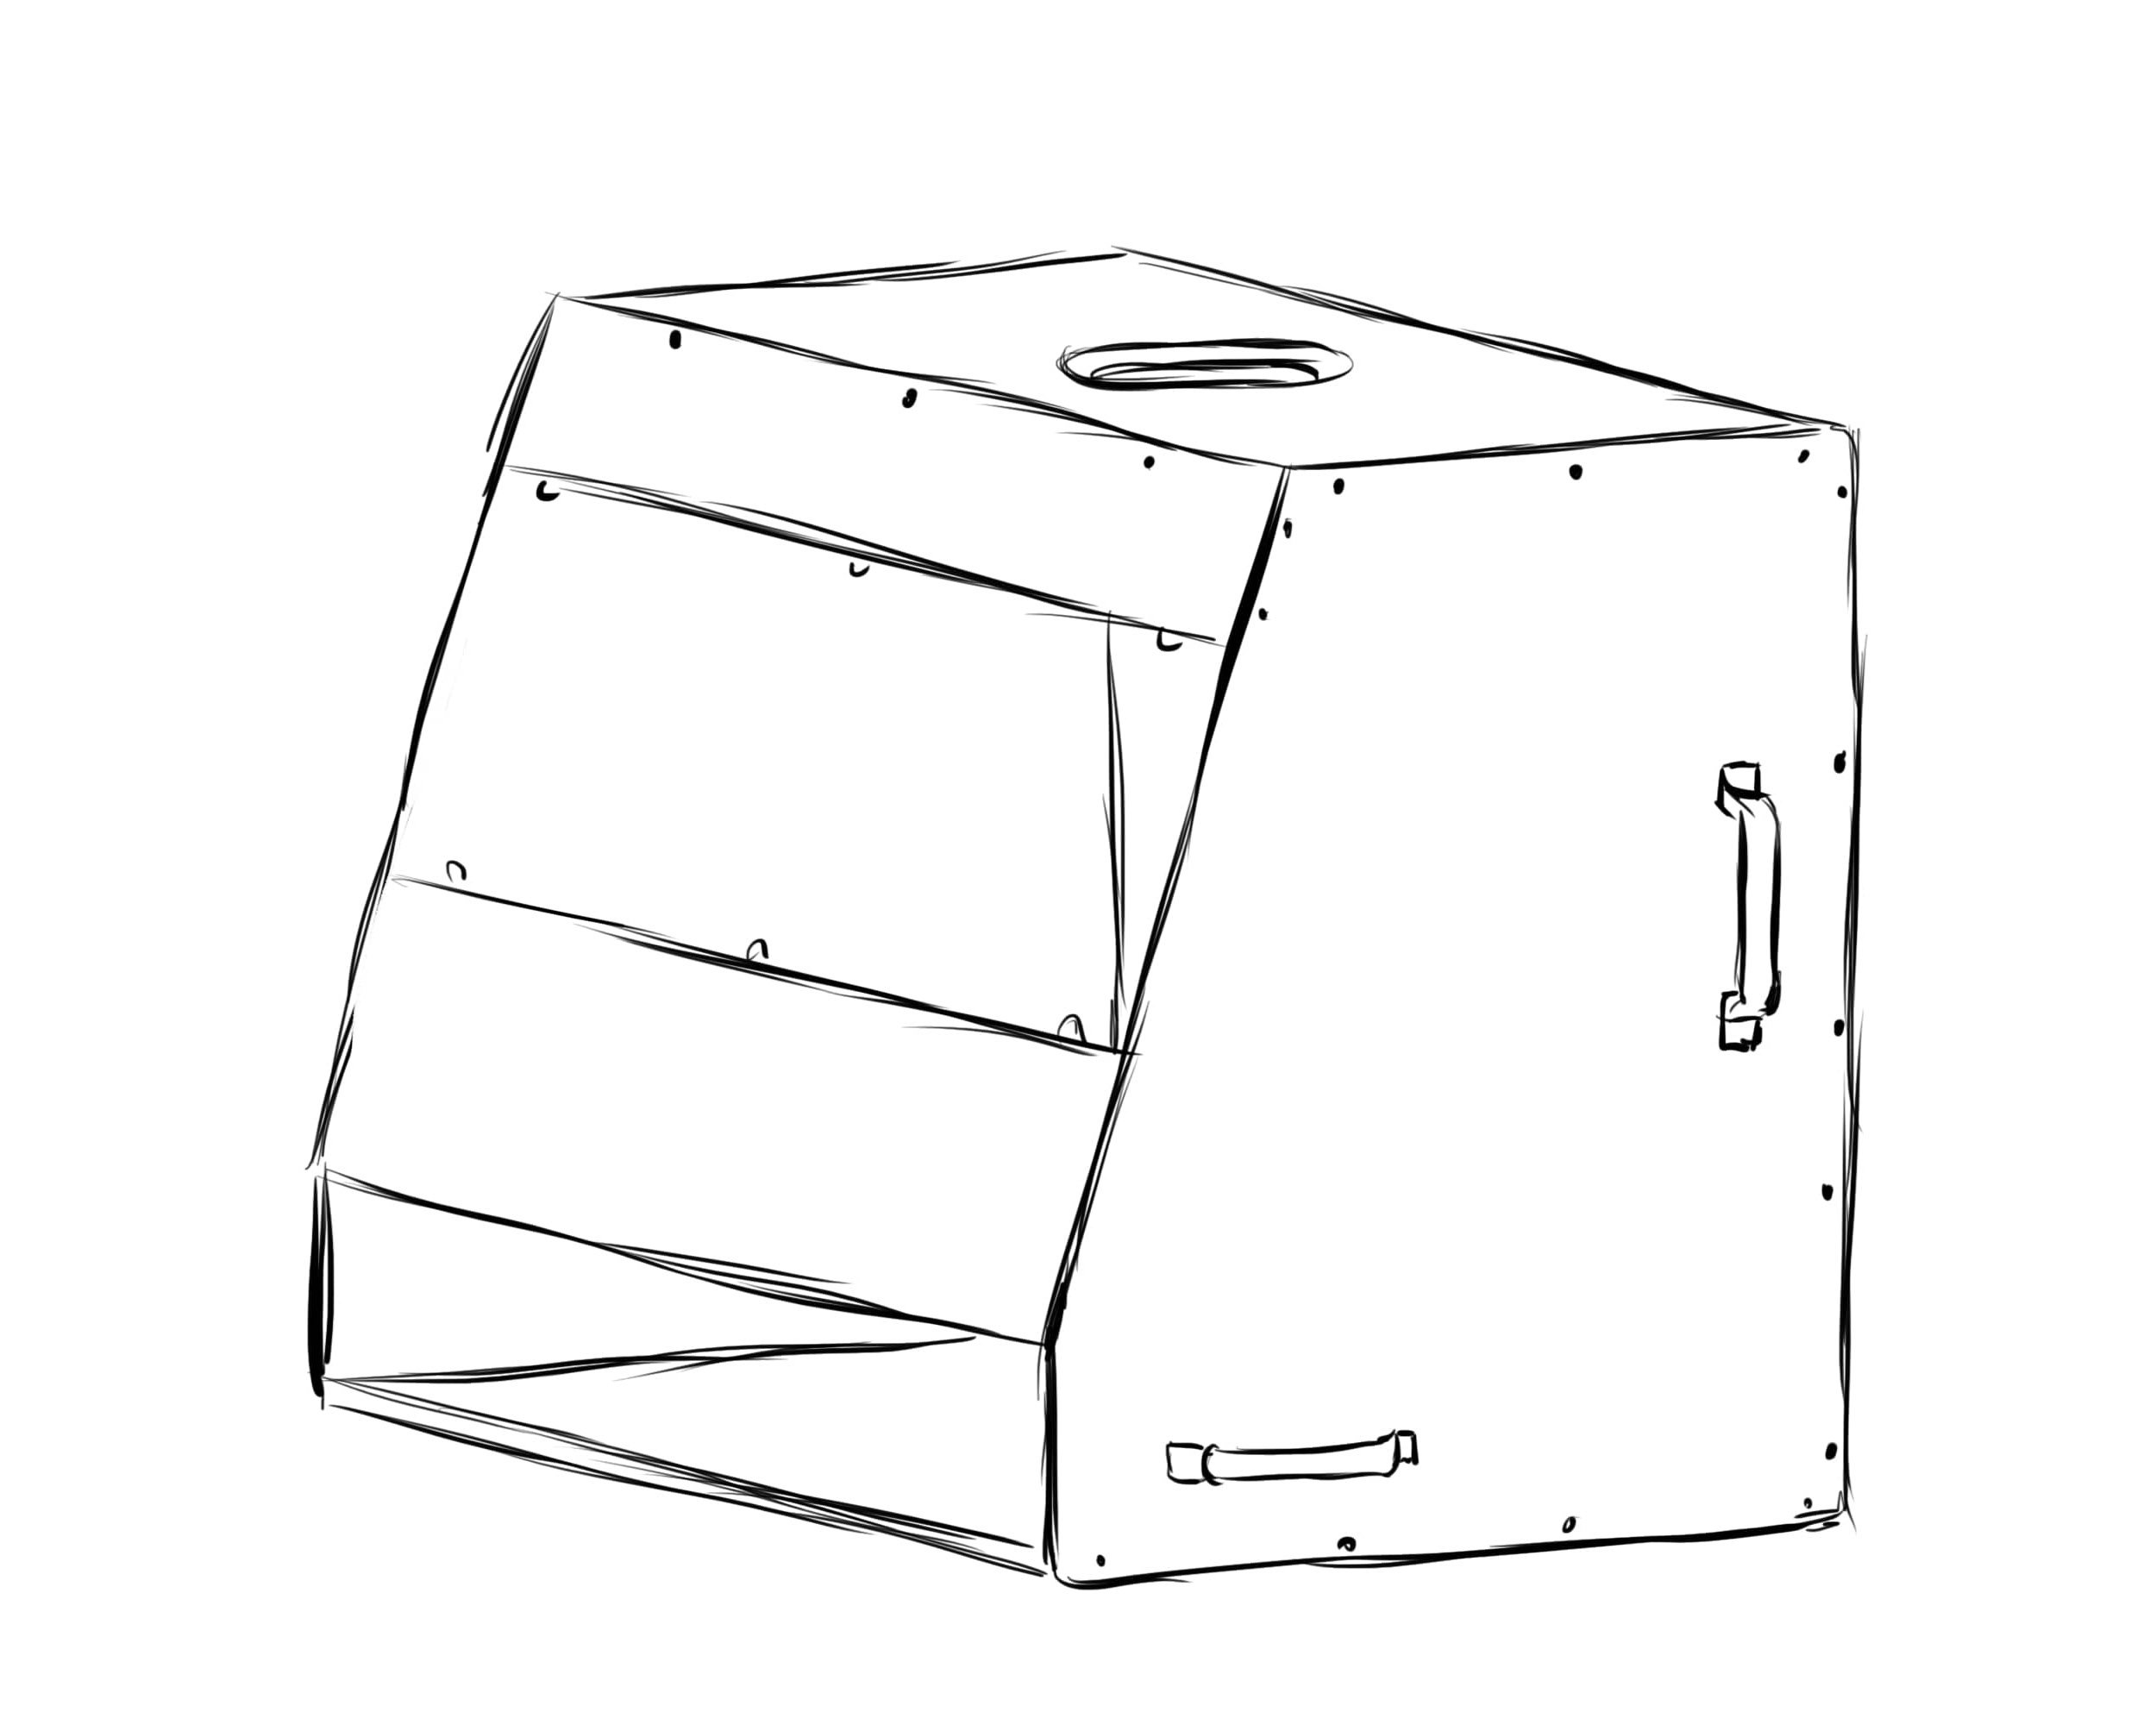 You’ve successfully mounted the windows; now it’s time to mount the handles. Draw points 15cm from the bottom plate and use the handles as a mold to draw the drilling points. Drill the holes with a 5mm wood drill, insert the bolts in the frame through the handles, and tighten the nuts.
Materials Needed:
- 16x Bolts and Nuts M5 x 30mm
- 4x Handles
- 5mm Wood Drill
- Handheld Drill
- Wrench 8
- Hex Key
Step 14: Mounting the Ventilation
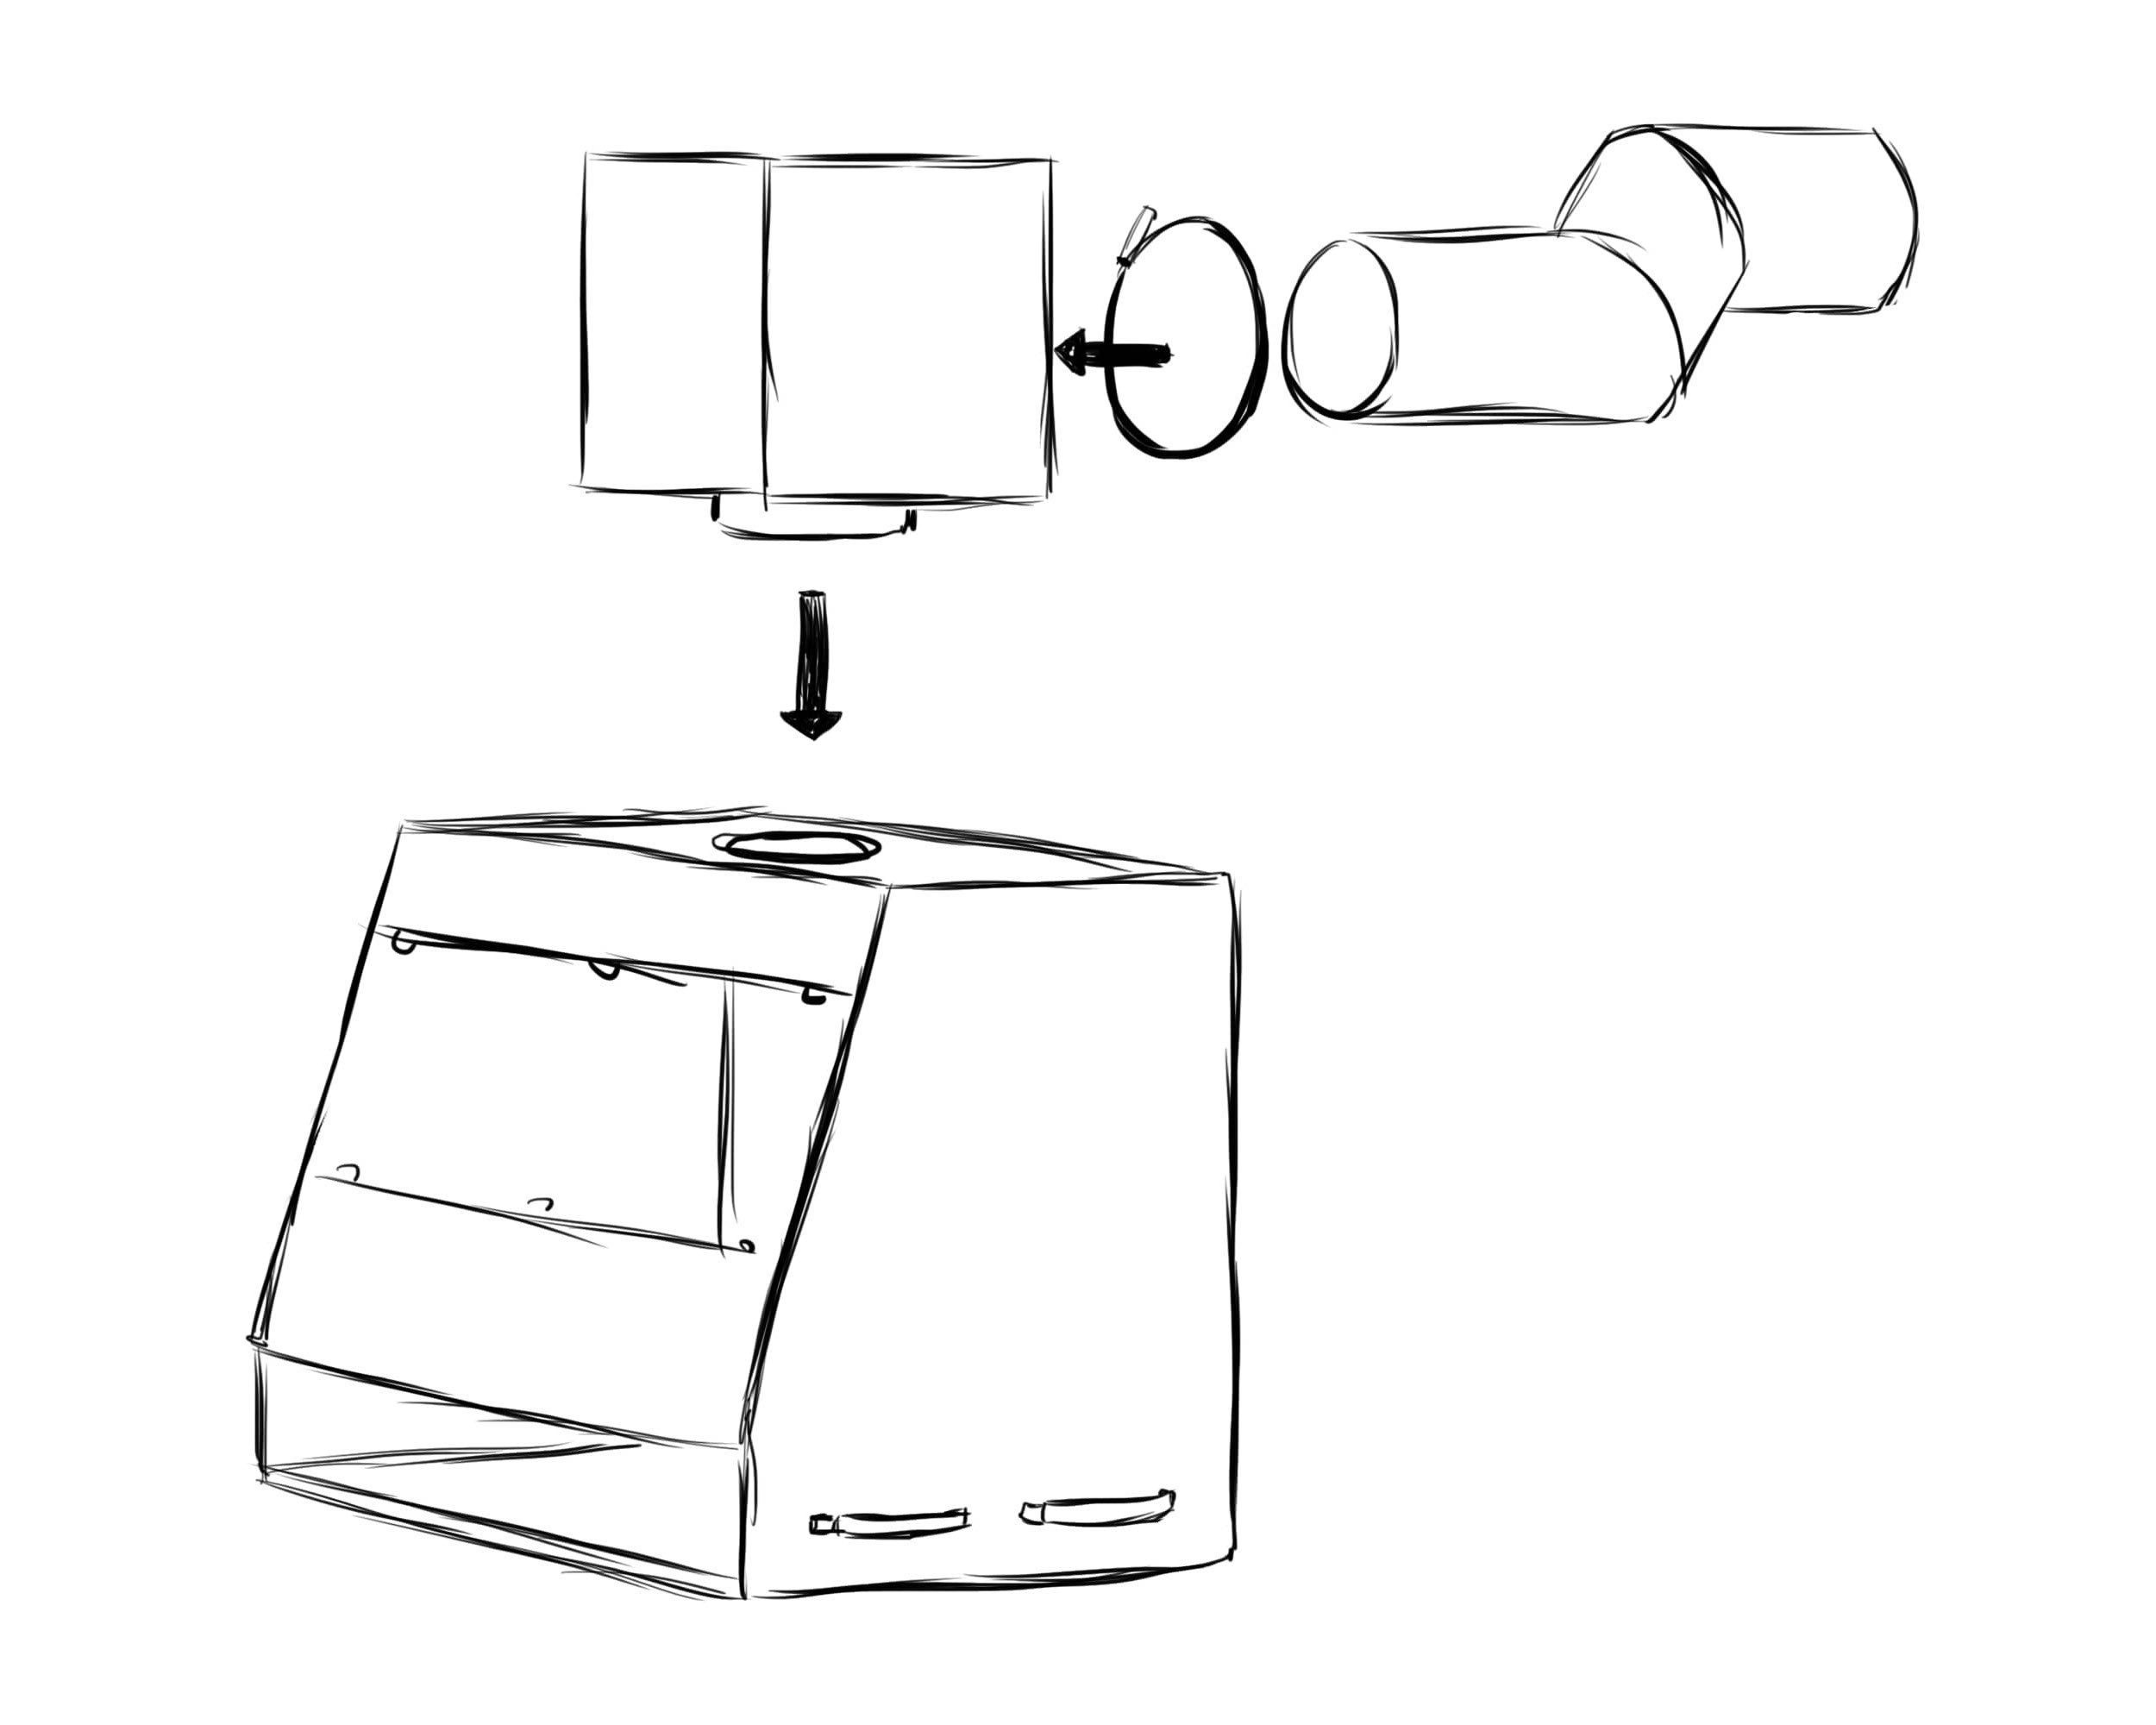 And here we are, the final step before you can plug and play with your very own homemade ventilating device.
It’s time to mount the ventilation. Start by sliding the ventilation hose on the ventilation tube and tighten the hose clamp so it’s fastened and can’t be pulled off.
Place the ventilation shaft inside the hole of the top plate and tighten the ventilation system on top.
Materials Needed:
- Ventilation hose 10m ⌀ 250mm
- Hose Clamp 60 x 270mm
Step 15: Plug and Play
Congratulations! You’ve just made your very own ventilating device. How cool is that? Sure, it did take over 3 hours but we know you’ll agree it was worth every second of it.
Plugin your fume hood, and you can see how it works!
Summary:
Securing your workplace and protecting yourself from toxic fumes is essential, especially when working with filament extruders and 3D printers. A fume hood is a ventilation device that effectively limits exposure to harmful fumes and vapors, creating a safe working environment. While purchasing a fume hood can be costly, building one yourself can be equally effective and budget-friendly. This step-by-step guide walks you through the process of creating a custom DIY fume hood, providing all the necessary materials and tools. With careful assembly, you can have your ventilating device ready to ensure a safe and productive workspace.
We hope this detailed and comprehensive guide helps you learn how to create a fume hood easily at home. While you can always purchase a ready-made industrial-grade ventilating device from the market, doing it yourself will save you significant amounts of money. At 3devo, we keep bringing you our detailed how-to guides on a range of topics!
If you have any questions about creating a DIY fume hood or want to share your creation or suggestions, reach out to us on social media!
Stay safe!
GP20 Plastic Shredder - Simplifying Recycling
Smart, safe, and simple recycling with the GP20 Plastic Shredder. Turn any plastic into 3D printing material effortlessly. Get yours now!
.png?width=1103&height=996&name=My%20project%20(1).png)