Share this
by 3devo on Jul 8, 2024 9:28:00 AM
PET is the most recycled plastic, having a recycling rate of 58.2% After it is recycled, it is called rPET, or recycled PET. Many companies thefefore are now aiming to reuse it and recycle it as new packaging. For example, some shoemakers have been turning rPET into sneakers.
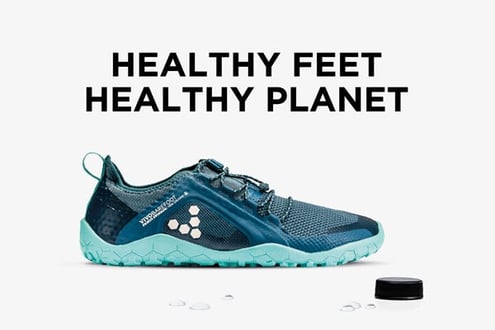
VIVOBAREFOOT Recycled PET Shoe Collection
Sneakers and packaging aren’t the only products you can recycle PET into; by turning it into 3D printing filament and 3D printing, you can produce unique designs and new products!
We’ve been able to extrude rPET into filament and print with it successfully and have collected all the steps into the step-by-step guide below so that you can too!
PET Preparation Guide
Collect the Required Tools, Materials and Equipment
Below you’ll find everything that you need in order to recycle your own PET.
Tools
|
Side Cutter
|
| Scissor |
| 2.5 mm Allen Key (Hex Key) |
| Cleaning Cloth |
| Empty Spool |
Materials
|
PET Bottles
|
| Acetone |
| Dishwashing Soap |
| Water |
| 400g of Devoclean MidTemp |
Equipment
|
A plastic shredder
|
| Airid Polymer Dryer |
| Precision 350 Filament Maker |
| 3devo Feeder |
| 3D Printer |
Step 1: Prepare the PET Bottles
The first step to recycling your bottles is to prepare them by cleaning and shredding them to the appropriate size. To get them ready for shredding we have to clean them from any residue, contamination and extra materials. The steps for this are:
- Unscrew the caps from the bottles and cut off the security rings using a cutter or knife. Be careful as the hard plastic might be challenging to cut with cutters.
- Remove the labels from the bottles using scissors or cutters. There might be residue glue leftover. We suggest removing it using a piece of cloth or cotton swab and Acetone. Acetone dissolves the glue, and thus it becomes easy to remove it.
- Clean the internal of the bottle using dishwasher soap (or any soap available at hand, we are generous here) and brush.
- Ensure that you have removed all the solid residue (in milk bottles), liquid, or any dust contamination. Contamination can cause inconsistencies and flaws in the recycled product.
- Dry the bottles by placing them upside down. You can put them in the sun for a speedy drying process but make sure the place is free from dust.
- Once dried, reduce the bottles in size. We advise you to do so using one of the following methods:
- Crushing the bottles flat by hand,
- Using a vacuum cleaner to shrink the bottles by removing the air,
- Using scissors to cut the bottles into small pieces (be careful as the sharp edges of the bottles can hurt you).
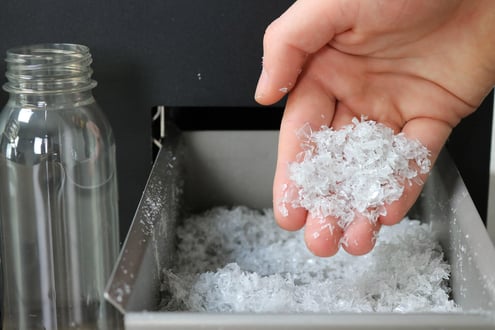
Step 2: Shred the Bottles
Now that the bottles are clean and cut into smaller pieces, they are ready to be placed into a plastic shredder. Our aim is to get them into smaller chunks no bigger than 4mm. When you’ve put them through your shredder, check the size of your pieces using Vernier Calipers or a ruler.
If after the first feeding the sizes are bigger than 4mm, feed the regrinds through the shredder once again.
Our GP20 plastic shredder is designed to efficiently process plastic and create consistently sized regrinds in a single operation.
Step 3: Dehumidify the Shredded PET
PET is hygroscopic, meaning that it absorbs water from the environment. This water can impact the quality and integrity of your final product. Thus, it is vital to remove this excess water.
The recommended method is to use a dryer such as the DW14 Dryer. This dryer allows you to change settings which include: airflow, temperature, duration, and stirring speed. The process to dry the regrind of PET bottles consists of the following steps:
- Fill the hopper of your Airid Dryer with your regrind.
- Close the hopper by screwing it tightly.
- On the control panel, rotate the knob to set the ‘drying temperature’ to 140oC or (284oF) and duration to 5 hours.
If you do not have a designated dryer like Airid, you can use your conventional oven for drying the regrind. Be careful with your settings, though, as too high of a temperature can melt the regrind.
Heads Up! Once you have dried the regrind, use it for extrusion immediately to prevent it from reabsorbing moisture. If you plan to use it later, we recommend storing the regrind in an airtight container or using other filament storing methods to prevent moisture from ruining your regrind.
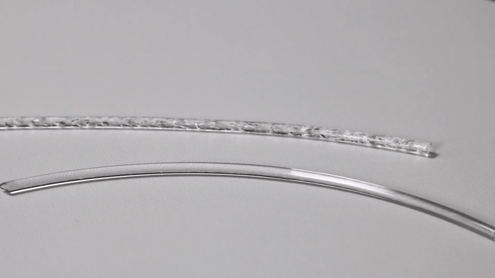
The top filament was extruded without drying the regrind and the bottom after drying the regrind.
Step 4: Preheat the Filament Maker
Typically, new filament makers come preloaded with pellets of materials like PLA. If the filament maker is already in use, it can have previously used material in the machine. In either case, to obtain the pure extrusion of PET, it is necessary to remove that material. These materials can have the same or different melting points than PET. For example, our filament makers have PLA pellets by default.
PLA has a working temperature of 60-190oC, whereas PET’s temperature range is between 350 to 490oC. So, if PLA gets heated to the working temperature of PET, the PLA will degrade or decompose, both of which we do not want. That’s why a transition material which is workable between the temperature ranges of PLA and PET is used. In our case, we used Devoclean EZ MidTemp, which works for both the cleaning and transitioning process.
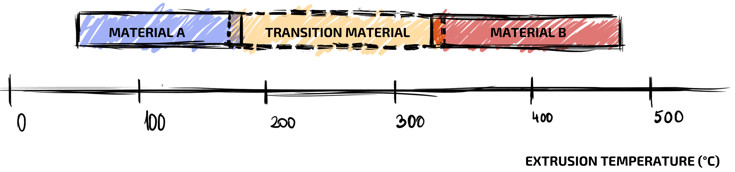
How Transitional Material Works.
To preheat and remove the existing material from the machine, follow these guidelines;
- If the current material in the filament maker is PLA, the recommended settings are:
- Heater Temperature to 200oC,
- Extruder speed to 15RPM,
- Filament fans to 30%.
- Start the machine and wait until the hopper gets emptied from all the existing material. To speed up the process, you can use a vacuum cleaner to remove the current PLA pellets from the hopper. (Usually, there is protection gauze on top. Unscrew the screws and slide to remove the gauze).
- Pour the Devoclean EZ MidTemp or HDPE Flush into the hopper. The recommended amount is 250g.
- Wait until all the Devoclean from the hopper has been extruded, the output of Devoclean is white, bubbly, and foamy.
- Once you observe the hopper becoming empty, change the machine settings for PET. We recommend:
- Heater Temperature to 270oC,
- Extruder speed to 7RPM,
- Filament fans to 30%.
- Continuously check for the hopper to prevent it from becoming empty. The machines have a built-in feature to turn them off if the hopper is empty for more than 10 minutes. However, you can turn this feature off in the settings.
- Observe the temperature of all the heaters; there are four of them. To reach 270oC, let all the pellets in the hopper get emptied.
- Now, feed in the PET regrind in the hopper. Use a small amount of PET at a time, as overloading can cause blockage and slow down the process.
- If you have already opened the safety grid, you can plug in the feeder and place it in the hopper. The feeder generates vibratory motions that help move the regrind through the extruder easily, as its sharp edges can make this difficult.
- During the extrusion, keep an eye on the contents of the hopper. Make sure that it stays filled to avoid any obstruction in the extrusion. Once the output is no longer foamy or bubbly, you’ll know that all the Devoclean has been extruded, and we are now extruding rPET.
The next step is to tune the settings to get the perfect extruded filament.
Step 5: Extrude rPET Filament
Now that we are getting pure PET at the output, it is time to set the proper settings for the mixture. Every PET bottle is made from a different batch, and it is vital to fine-tune the settings to get a perfect filament as output. The aim is to achieve a round filament which has no air bubbles and has a consistent diameter. Below are the various settings which you are able to modify.
Temperatures of Heaters
Try to change the temperature of each heater in the interval step of 5oC. Check the filament for the required product.
The RPM of Extruder
The RPM of the Extruder is essential. Usually, the key to quality is lower RPM. However, a much slower extruder can result in a slower process, product build-up at the nozzle, and premature hardening at the nozzle end. Therefore, the optimum value lies in the middle of the RPM range of the extrusion machine.
Speed of Filament Cooling Fan
The Filament Fan serves the purpose of cooling the filament/product coming out of the nozzle. A higher speed will cause speedy hardening blocking the process. A slower fan can cause the filament temperature to rise and thus forming a liquid-like form.
The recommended settings, during our experimentation, were:
- The Heater Temperature to 245oC,
- Extruder speed to 7 RPM,
- Filament fans to 15%.
But again, these are the settings well suited to our batch of PET and environmental conditions, and yours can vary accordingly.
Spool the Filament
After you begin to observe a continuous filament of desired quality, it is time to wind the filament on the spool.
- Take the empty spool and tighten the spool holder on this empty spool.
- Go to the settings, start the spooling wizard, and follow the instructions as indicated on the screen.
- Cut the filament off the product and attach it to the spool by guiding it through the positioner.
- Place the spool on the winder shaft, tighten the winder and start the winding.
- Close the safety door.
- During the process of spooling, keep an eye on the regrind quantity in the hopper. Fill the hopper with more regrind as needed.
- When the spool is wounded, cut the filament using scissors and remove the full spool by untightening the screw.
- As stated earlier, PET absorbs water. So, either uses the filament directly after spooling or store the spool in an airtight environment.
Purge the Filament Maker
Since there is molten material inside the Filament Maker, it is necessary to remove it before turning it off to prevent hardening in the Filament Maker and clogging the machine. You can do this by:
- Allowing the materials in the hopper to completely use or vacuuming the regrind out of the hopper.
- Add Devoclean EZ MidTemp in the hopper. We recommend using 50 grams of these pellets.
- Turn up the RPM to 15 to speed up the process.
- Remember, the output of Devoclean EZ MidTemp should be foamy and bubbly.
- Once all the Devoclean pellets are used, stop the extrusion, and turn off the machine.
1. Weak Flow Out of Nozzle
The possible causes of weak flow out of nozzles are ratholing or bridging the regrind, making it hard to pass from the hopper to the extruder.
Troubleshoot: The troubleshoot includes stirring the regrind in the hopper using the feeder or a spatula.
2. Solid Bumps Appearing in the Filament
Solid bumps in the filament indicate the presence of contamination or impurities in the regrind.
Troubleshoot: Make sure to clean your PET bottles properly and protect your regrind from dust (storing it in a container until use can help).
3. There is Build-up in the Nozzle
Nozzle build-up is due to the premature hardening of the product coming out of the nozzle. The possible reason for these faults can be the cold nozzle.
Troubleshoot: We recommend increasing the temperature settings of Heater H1, decreasing the filament cooling fan speed, lowering the fan orientation from the nozzle, or having proper insulation of the nozzle area through a magnetic plate.
4. The Molten Filament is Collapsing
Nozzle build-up is due to the premature hardening of the product coming out of the nozzle. The possible reason for these faults can be the cold nozzle.
Troubleshoot: The troubleshooting involves lowering the heating by decreasing the temperature of the heaters. In addition, we recommend reducing the fan cooling. During the troubleshooting, make sure that you do not reduce the temperatures too much, or nozzle build-up may occur.
Tips for 3D Printing Your Dream Design
Now that you have your spool full of PET filament, you can use it to 3D print your dream design. These are the steps we took to make it happen:
- Open the slicer software on your computer. We used Cura, but you can use any of the ones you are comfortable with and upload the STL file.
- In the printing settings, set the settings to the following temperatures:
- Printing temperature to 255oC,
- Bed temperature to 70oC.
- For better adhesion between the subsequent layer, we suggest you turn print cooling off.
- You can decrease the print speed to compensate for the lack of cooling. We recommend the settings to be 20mm/s.
- Start the printing and enjoy the process!
Recycling PET bottles is about science, but luckily, it’s not rocket science. With patience, the proper technique, and finding the correct settings for your PET bottles, you can turn your waste into valuable products.
Are you interested in learning more about this plastic? Then, head over to our Ultimate Guide to PET, where more details and information are available!
Environmental Impact of Recycling PET into 3D Printing Filament
In addition to the practical benefits of converting PET plastic into 3D printing filament, it's important to highlight the positive environmental impact of this process. Recycling PET reduces the amount of plastic waste in landfills and oceans, contributing to a cleaner environment. Turning used PET bottles into valuable rPET filament helps to lower the demand for virgin plastic production, conserving natural resources and reducing greenhouse gas emissions. This sustainable approach aligns with the growing trend towards a circular economy, making your 3D printing projects not only innovative but also eco-friendly.
Refer back to our step-by-step process for detailed guidance on how to achieve these environmental benefits through proper preparation and extrusion of PET plastic. By following these steps, you can ensure your 3D printing projects contribute to a more sustainable future.
Conclusion
In a world striving for sustainability, recycling PET plastic into 3D printing filament emerges as a remarkable and eco-conscious solution. As we venture through 3devo's ingenious step-by-step guide, we unlock the potential of PET bottles, transforming them into high-quality rPET filament. It's a creative journey that repurposes waste and empowers us to craft unique 3D-printed designs that breathe life into imagination.
With meticulous fine-tuning of settings during the extrusion process, we achieve a filament that boasts consistency and flawlessness. Armed with this sustainable resource, we embark on the mesmerizing 3D printing adventure, witnessing our dreams materialize layer by layer. As we hold the fruits of our labor in hand, we realize that every creation nurtured by rPET filament is a testament to our commitment to a greener and brighter future.
So, let's unite in this transformative movement where innovation meets responsibility. Embrace the art of recycling and 3D printing, and together, let's shape a world where sustainability and creativity flourish hand in hand. Happy recycling, happy printing, and let's sculpt a more unique and sustainable tomorrow!